Description
About This Video
Transcript
Read Full Transcript
One of my favorite things to do on Pawleys anytime our tutorials and they're little short bites of information that I find to be helpful and useful. Uh, this first tutorial is going to be on what I call common grippers and we're going to talk about the glute thigh relationship, how it builds up through the spine and to how people kind of grip with their neck and shrugged their shoulders. So the first thing I want to show is standing facing this table. I'm gonna have you put your left leg up here on the table and this can be translated into going up front or just standing leg pumping on the chair. Oftentimes what happens is people kind of grip their buttocks and they tuck under then that five bulges forward. Can you see that?
And then the shoulders kind of round and that this is their get up and go place. But there's not a lot of strength here. And before we pay attention to this, a client or a person might think, oh, I'm going to just stick my chest out and come up really tall. But they haven't done anything to change their base. So first I have to teach them that the hip socket is in the growing. Okay. And what that means is one finger widths away from your pubic bone, one pointer finger, wherever that closeup is, one point your finger is that distance from your pubic bone.
That's where your hip joint is right there at that hip crease. And so what I'd like for her to feel is that hip crease going backwards and then actually come on down from there and then move your right foot forward for me. And then take your left leg up there again. And although this seems like it's kind of close, I really want you to put your own finger at your hip crease and let that hip joint go backwards. Okay? What's going to happen now is she starts to feel like she's falling backwards.
But what you actually see is a nice lift of the leg and you see the glute. So many times a common gripper person do it mistakenly again, kinda tries to hide their buttocks underneath them. So again, we're going to go back into the hip joint, let the buttocks be where it needs to be and then build up your spine. Yeah. And then we build up from there. So then we have a glute and we have a thigh and we have the calf all in alignment there. And then the hands come behind the head to activate the core. And I'm just going to have her hold this. So again, the lift up from here is what is so important. You okay there?
They holding that position. I'm going to take this band now. This oftentimes can give a little feedback as well. Just like a little, excuse me, a little pulling back of the, of the thigh socket here. She's really fighting to stay vertical and that that's a good thing. Just kind of getting awareness into her back body. Say she doesn't, um, kind of Tuck it forward again. So taking that awareness now coming lie on your back here.
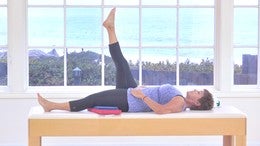
Let's get you back a little bit further. Good. Okay. With your hands down by your side, bend your knees. Okay. So now we take this idea of kind of a buttocks grabber gripper kind of thing. Curl your bottom and just push your, uh, buttocks up to the ceiling. Okay. And really kind of Tuck your bottom.
So oftentimes the tucked bottom comes with a pooching belly. She doesn't really have a pooching belly, but go ahead and give me a pooch belly anyway. Yeah. And they kind of don't know where to get their relationship from. So drip your body back down and rest. And now we need to really differentiate between the tucking bottom.
So go ahead and Tuck and lift up because in this tuck position, when your pelvis is in a posture, your tilt, your hips are already thinking, Hey, I'm an extension. So now I'm going to have her narrower legs and look at, I'm going to take my hand underneath her sacrum here and I'm going to say, let your pubic bone go away. That's it. So even even think, arch your back over my finger. Nope, come on down a little bit. Good. So Archer back over my fingers. Nope. Come down. Arch your back. I'm going to lift your sake or him up like you're dripping your buttocks over the edge. There you go. Okay, take some little while. It doesn't matter what you say as the teacher matters what the client hears.
So hold that right there. I'm going to take my hand away. So what happens now is she's in this neutral bridge. So we've almost done a tutorial here on the difference between a neutral bridge and an articulatory bridge. But this is almost a little bit harder because now this is into her hamstrings and her glutes. And now just drop that buttocks down without changing the shape of the spine here come up in that neutral bridge.
It almost is like you're lifting with your belly button here. I have this imaginary string right here. Very good. Hold right there. She may feel like she's in this huge extension right? But you're really not. She's just in neutral. As she drops down, she's gonna crease her hips and drop back down. Please take your hands to the ceiling.
I'm just doing this for the sake of the camera. Kind of Tuck your bottom Kinda hard and flatten out your back. Okay, here's a common gripper. Again, the bulging belly, the back is flat because she's pushed it. And then look what's happened to the pictorials and the shoulders. They've already come to round. Okay, so keep the gripping and lift up. I'm sorry, I'm not going to keep her here long.
It didn't feel very good to her anymore, but this used to be her area of strength where it came from. Now open the chest, drop the shoulders. Beautiful. Lengthen your abdomen by allowing your pelvis. Beautiful. Just like that. Look at this long line right here. And then drop your bottom down towards my hand and then lift it back up again.
Good. And then drop it down and then pause right there. Arms come down by the side. So in the common gripper pattern of the buttocks tuck and the [inaudible], uh, belly bulging comes into the chest rounding. Then you say, well Gosh, how do I get up into a high bridge? So let's build the high bridge in the high bridge. We need to be sure that the shoulder bones are actually into the mat a little bit. If she had a big space here, I might put something here that I call fill the empty space.
You can find that on a fill your empty space tutorial. Now she's gonna lift up into her lowest bridge. Come on. There you go. And now as she holds this bridge, we now have to get this part of the bridge to come an extension. Otherwise we'll never have a back bend. So I'm going to put my finger between her shoulder blades and ask her to start to lift the sternum towards her chin.
Not Her chin towards the sternum, but her sternum towards the chin. Very good, very good. So now she's coming into a little higher bridge. Now she can bring her feet a little bit underneath her [inaudible]. Now she can press her glutes and her thighs and she can lift this whole package higher and then start to journey the thoracic spine into what?
Position? Extension. But I need active extension of my upper back muscles, not just a thrusting up of my lumbar spine, but a journey if you will, of the chest coming towards the chin. Very good. Stay there. Please. Bend your elbows. Use your upper arms to kind of press down to the mat. Beautiful job. Feeling the chest lifting up any bit more.
So now she's doing such a great job here. I'm going to have her narrower her elbows and and see where her poems are because ultimately when we do the high bridge with kicks, you're going to want that buttocks to lift so high that it comes onto your hands. Whether she gets there or not today isn't the issue, but the way that you get there is by continuing to lift here. Also, what she's doing so well here, she's not smashing her neck. We'll go over that common gripper and a little bit. Good, and then take your hands away and then just journey your spine down. Taking your time all the way down, all the way down.
Very good. One of the other common grippers that I find in a bridge. She's not doing it, but I'm gonna ask her to do it. Kind of flatten the front of your neck. Okay. When people flatten the front of the neck, it's the same people or body type, excuse me, that tends to smash their back.
Go ahead and smash your back and bulge your belly. Yeah. Ooh, that's nice. There's no support here. Can you feel? That's just kind of force and then release all that. So it's not always that we lengthen the back of the neck, but at the top of the bridge, come on up again. Take your time. Build your low bridge first, right? It's all about the setup.
You can't build a high bridge without a low bridge. [inaudible] and then we start to journey at some point, this high bridge is about the front of the neck flexors to hold the space, if you will, of no extension. So as I keep my hands right here, she's doing a really good job of continuing to do three. Here you go. Now Bend your elbows and just see after this second bridge, her hands are indeed actually closer to underneath there. So the next challenge would be can you hold your arms, hold the chest position of the faces. Good.
And then take your left leg and just crease it in at your hips without changing the shape of your spine. Hole. Five yes, eyes bugging out of the head. Four, three, two, one. Put that leg down and then drip your body all the way back down. Okay, and now we're going to move this to standing vertical bridge, if you will, using the pedal pole. This is the Peda pole without the springs because we're making a wall. So standing with your back to the wall, having your feet just be a little bit further weapon to pull your shirt down just a little bit here. So what I want to create here, I'm going to pull this over this way, is is the idea of what?
A standing bridges, okay? So as she grows tall, show them a butt tuck and a flattened back and rounded shoulders. Okay? Again. Some people come in and then they think that standing up straight it is just pulling the shoulders back. But we know that standing up straight is a relationship from your feet pressing down and your bottom lifting up. Yeah, that's really good. And now I want you, you feel my hand here. I want you actually now to take this away from the pole. Hang on, hang on. As you journey your chest upward. So that yet, so now she's building a bridge and you're going to push in your feet.
Take your sacrum away from the pole. [inaudible] keep your head back and then journey your chest up. Yes, until only your head is on the pole. Beautiful there. Now look at my hand here. Nod Your Chin a smidge good there. Now she has to keep in contact with these deep DNF, deep neck flexors. Okay, holding that right there.
And we'll build the deep neck flexors in another tutorial on just a second. Scooping in here. No back touching the pole, holding yourself right there. Now take your buttocks away. Take your buttocks away. Hold right there. But grow up out of your hips. There you go. You really want to change your head, right? But good. If you smile, actually that affects your hyoid bone a little bit differently. Keeping that there very good.
And then take your body back to the pole and then come away from there. So I do a standing bridge sometimes against the wall, and people are really surprised at how we engage the upper back extensors, but not the cervical spine extensors. So we space hold the position of the neck and we'll visit that again in another tutorial in just a second here.
Comments
Best wishes from the UK
Sarah
You need to be a subscriber to post a comment.
Please Log In or Create an Account to start your free trial.


