Description
This is a great class to use as a preparation for a full workout.
About This Video
Transcript
Read Full Transcript
Welcome to Pilates Anytime. I'm Elizabeth Larkam and I'm so happy to be back with you. (cymbals chime) I've spritzed my mat with Soul Support. You might think it's S-O-L-E support, it's actually S-O-U-L Support. But we'll take it.
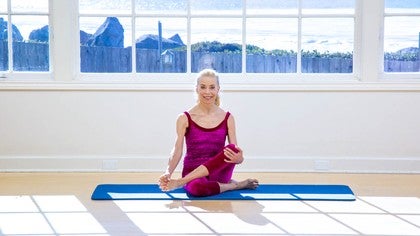
Support for your soles and support for your soul. We're going to do my favorite go-to foot material, hands-to-feet material. You don't need any props, just you and your bare feet. Now you can do this seated on a mat, one leg outstretched, the other shin crossed over. You can also do this seated in a chair, seated in your airplane seat, seated on the edge of a bed, seated on the edge of the reformer.
You can use this material to open up your mat classes or your equipment classes, here we go. Cross one shin over the other thigh, whichever shin, whichever foot, whichever side needs the most attention. Now use the opposite hand and clap the sole of your foot. Just awakening the proprioception of your feet. Use your thumb and first finger, take ahold of the base of the little toe and pull your little toe long in a spiral, as if you were gently pulling a cork, spiraling out of a wine bottle.
Change to your fourth toe, pull it long in a spiral, turning your fourth toe away from the big toe. Change to your third toe, pull long and spiral away from the big toe. And change to your second toe. You can either pull it just long or spiral it away from the big toe. Now take all four fingers and wrap them around your big toe, draw the big toe away from the others, and spiral the big toe toward you, away from the other toes.
Now you need the thumb and first finger of each hand, hold on to the base of your little toe and the end of your little toe and twist, as if you could unscrew the lid and the base from each other. Change to your fourth toe and twist. Each toe gets a turn for this. You might ask yourself, how much pressure do I use? Well, this is not a chiropractic adjustment.
Instead, this is to wake up the proprioception, the sensory awareness of your toes. Hold on to the fifth toe and the fourth toe. Cross each toe over and under its neighbor. So how much pressure should you use? Have the idea that you can contact the tissue around the bone, the periosteum and then change to your fourth and your third toe.
Because it's in your toes and in your fingers that the deepest fascia, the fascia around the bones comes close to the surface. Cross your second and third toe over and under its neighbor, as if you could braid your two toes. And then cross the second and the first toe, above and below, I know braids take three but this is just crossing the toes. Now, interlace the fingers between your toes, as if you could shake hands with your own foot. Pleased to meet you, or oh, have we met?
There's a notch between your thenar eminence and your hypothenar eminence, where the metatarsal, the ball, the head of the metatarsal, the ball of your big toe, can nestle right in there. So once you shake hands with your own foot, using the opposite hand from the sole of your foot, begin to circle your ankle. Now it's your shoulder blade that's gliding around your rib wall, the scapula's gliding on the curve of the thorax, reverse direction. It's as if the movement of your shoulder blade would encourage the movement of your foot and your ankle. So now you're circling your ankle with your thumb on the outside of your big toe.
Change now so the thumb comes on the inside of the big toe, nestle your fingers between your toes, so now the little finger is on the outside of the little toe and resume. And you might ask yourself, well, what difference does this make, if your thumb's on the outside or if your little finger is on the outside? Reverse direction. By now you've been in Pilates long enough that you know that everything makes a difference, it's a matter of to whom and how much. You see, when your thumb is on the outside of your big toe, it makes it easier to draw your foot towards the midline.
However, when your little finger is on the outside of your little toe, there's a tendency more towards eversion, so you get different ranges of motion, different stimulation through your ankles and the proprioception of your ankles and of your feet make such a significant contribution to balance, so preparing yourself for the demanding work of your day can be very valuable, this way. Now, uncross the current shin and put it on its own same side. Now you'll need two hands in order to reach your metatarsals. So hold on underneath your little toe side of your foot to the fifth metatarsal and put your thumb on top. The other hand will hold on, underneath the fourth metatarsal, with your thumb on top.
And jiggle your metatarsals up and down, from ceiling to floor and ceiling to floor, making your way down the metatarsals to your toes and then reversing to come back to your midfoot. So you stimulate the movement of your fifth and fourth metatarsal with respect to each other. Change to your fourth and your third metatarsal, and you make your way from proximal, from the midfoot, to distal, towards the toes and from distal to proximal, towards the midfoot. Continue down the line to your second and third metatarsal. And from the distal to proximal, until you get to your first and second metatarsals and encourage them to move, ceiling and floor, with respect to each other.
Now use the same side hand as foot and interlace your fingers from the top of your foot. So now, the palm of your hand, the plantar surface of your hand, is in contact with the dorsal surface of your foot. And swivel on your heel, as if you could wag your foot a little bit, swiveling to the inside, to the outside, inside, outside. And you can add a bit of a scooping motion, a sand-scooper motion, so it would be supination, inversion, pronation, eversion. Change now so the thumb, which was on the outside, now comes on the inside and continue this motion.
Keep your knees fairly steady, so this is a motion of your ankle and your lower leg. You just finished using your same side hand to top of foot, but wait, there's more. Now you use the opposite hand to the top of your foot. Have your little finger on the inside of your big toe, your thumb on the outside and by now, the mind reels, how many ways can your hands contact your feet? At least two, four, six ways in this particular sequence.
Change now, mm-hmm, and everything makes a difference, it's a matter of to whom and how much. Generally speaking, if you experience all the, or many different variations, surely one or two will identify some kinesthetic blind spots, where your brain goes, whoa, whoa, whoa, whoa, whoa, whoa, whoa, we haven't been here before. Now let go with your hands and take a look at your two feet. One foot, one side, one foot, one ankle, has gotten a lot of stimulation, sensory and motor stimulation and the other side, still waiting for its turn. It's not unusual, she said, leading the witness, it's not unusual to notice a difference in color and a difference in articulation of your two feet but we're still with the foot that's getting the current attention and it's time for doming, it's time for doming on parade.
Plant the pads of your toes, lift your metatarsals, the ball of your foot up and draw your heel forward so doming on parade. Drawing your rearfoot towards your forefoot. Reverse, vault off the tips of your toes and glide your heel back. Hours of entertainment there, sometimes it's useful, if you're teaching this to yourself for the first time or to others, sometimes it's useful to plant the toenails, push the toenails down and then use your other hand to lift up, underneath the ball of your foot, 'cause this is a coordination that doesn't necessarily come readily, especially when feet have been encased in shoes. Now it's time for waving your foot, articulating from heel to the ball of foot, spread your toes long, and now make a fist with your toes and pull back.
Press through your heel, through the rearfoot, press through the balls of your, the ball of your foot and then spread your toes and reach the toes long, make a fist with your toes and pull back. It would be as if you could encourage your articulation of your foot to remind your spine about its undulation possibilities. I know that I cannot do this motion without lifting my eyebrows high. Reverse direction, make a fist with your toes, drive down into plantar flexion, reach long with your toes and pull back. Make a fist, down through plantar flexion and back through dorsiflexion.
Sort of, it's fascinating, kind of like a cat watching a laser pointer, like ooh, look at that foot go, okay. Now grab in, fling out, grab out, fling in. Grab in, fling out, after I teach this stuff to my mat classes or use this to prepare for the jumping sequences on the reformer, I look at my eyebrows and go, whoa, or my forehead and go, oh, jeez, maybe this is the year for Botox. Maybe not though, I've held out long enough and you know what, I will be 65 this year, so, mm-hmm, my first time in January to come public with that knowledge. Okay, so, hours of entertainment.
Now this foot is all happy for the moment and it's time for the new side. Cross one shin over the other thigh and use your opposite hand from the sole of your foot and clap the sole of your foot. In part, this is to wake up the sole of your foot and the palm of your hand but also, the reason that I have the opposite hand clap the sole of the foot is that so often, I'll be teaching this sequence, and then I'll notice that someone's been doing the whole thing with the same side hand as foot. There's actually, I think, a richer neurological connection when the upper extremity on the one side is in contact with the lower extremity on the other, making a full circuit around yourself, so don't shortchange yourself that opportunity. Having identified the opposite hand to foot, now use the thumb and first finger, hold onto the base of the little toe and pull the little toe long, spiraling the little toe away from the big toe and the other toes.
Now pull the fourth toe long and spiral. Don't confuse a spiral with a swizzle stick. Now I don't drink, so I know nothing about corkscrews or swizzle sticks, however, I notice that sometimes when I teach this, the person is twirling their toe, as opposed to spiraling it and in this case, the spiral, the corkscrew analogy is more appropriate. Pull the second toe long and spiral it away from the big toe and now nestle your big toe in all four fingers, make a little cocoon with your thumb on the top. So cocoon your big toe, pull it long, and spiral your big toe away from the others.
Now it's time for two hands to one foot. You'll need the thumb and first finger of each hand, hold onto the base of your little toe, and the distal end, or the lid of your little toe and twist, twist the base and the lid, the distal and proximal areas in opposite directions. Change to your fourth toe and twist. Have the idea that if you use sufficient pressure, not to cause pain, but to encourage the tissue next to the bone to glide. And now the second toe.
That may have been wishful thinking on my part because I'm no osteopath, I'm only a movement educator and what do I know about the actual gliding of periosteum on bone, but sometimes images are sufficient. Now, hold onto your fourth toe and your fifth toe and cross each toe above and below its neighbor. Change to the fourth toe and the third toe, crossing above and below. Change to your third and your second toe. And change to your second and your first toe.
Now interlace your fingers between your toes. Everybody has a different amount of space between their toes and a different amount of thickness of fingers and thickness of toes, so be assured that it's not necessary to nestle your toes, the base of your toe right against the base of your fingers. It's just fine to have a more distal contact there because not every option is comfortable for every person. I probably do this once a day at least, so I'm accustomed to it. Now here you are, shaking hands with your own foot.
Pleased to meet you, or you seem familiar, have we met? You're nestling the first metatarsal head between the thumb and little finger mounds or eminences, once you get a good grip, then bring your attention to your shoulder blade, to your scapula and encourage the motion of your shoulder blade to glide, down, in, up, and forward, tilting forward, tilting back. And you can remind yourself to relax your jaw on the same side. Reverse the direction now. Relaxing your fingers a little bit, so you don't have to keep a circulation cut-off grip, but sometimes relaxation of the grip will make it easier to feel the flow from your shoulder blade, through your shoulder girdle, down your arm into your wrist, your hand, and your foot.
Change the interlacing now, so the thumb, which has been on the outside of your big toe is now between the big toe and the second toe and appreciate that this different contact for your hand and for your foot makes a difference also in the mobility of your ankle and reverse direction. It also makes a difference in the mobility of your scapula. Now, something I forgot on the first side, bonus on the second side, pull your toes back, using the opposite hand, so you tension the plantar surface of your foot and then you stroke the plantar surface of your foot from big toe to heel, second, big toe to heel, third metatarsal to heel, fourth metatarsal, and fifth. Don't get anxious now about the first side, as soon as finish this side, this particular sequence on this foot, we're going right back to the first side, just so no one is neglected, okay. It makes a difference, actually, whether you current the flow of your touch from the metatarsal head to the heel, from the forefoot to the rearfoot or whether you current from the rearfoot to the forefoot.
Preview of coming events in standing, when you current the tissue action from rearfoot to forefoot, it will draw, make a deeper abdominal connection to be seen shortly. Okay, leave this foot, just temporarily, and go back to the first side. Pull your toes back and then stroke the sole of your foot with the pads of your fingers, from the first metatarsal head to the rearfoot and then the second and the third and the fourth and the fifth, first, second, third, fourth, fifth, reverse, going from the rearfoot to the forefoot, fifth, fourth, third, second, and first. (chuckles) You'd think she'd know this sequence if she does it so often, I just don't do it on camera often. But wait, there's more.
And then there's the wringing out of your foot, twisting the forefoot with respect to the rearfoot. The first side is finished. Twisting the rearfoot with respect to the forefoot. By now you're thinking, could I just have a playlist? Yes, I will make one for you and we will post it at the end of the class or as a reference for this class, so that you'll have reference material, articles, and also a clear recognition of sequence.
Now, uncross this foot and it's time to address the mobility of your, the movement of your metatarsals. So hold on to underneath the fifth metatarsal and underneath the fourth metatarsal and wiggle those metatarsals, ceiling and floor, ceiling and floor. Start proximal and move to distal, then go from your toes back to your midfoot. Now the midfoot to your toes and the toes to your midfoot for the fourth and third metatarsals. Now the second and first metatarsals and come back.
Use the same side hand and interlace your fingers from above so the palm surface of your hand is in contact with the dorsal surface of your foot. This would not be a pleased-to-meet-you, this is not a handshake but it is a significant contact that facilitates some mobility of your ankle when you pivot on your heel. Keep your knee steady so the motion, the twisting motion is in your lower leg and your ankle. Change the interlacing so your thumb is now between the big toe and the second toe. It will be easier to move in the direction of eversion here.
And now you change hands so the opposite hand is in contact with your foot and twist a little bit. A greater range of motion in inversion, now, as you pivot on your heel. Change the interlacing so we have a total of two, four, six different interlacing contacts of hands and feet. Time for doming on parade, draw your rearfoot toward your forefoot, lifting the metatarsal heads up, gliding your heel forward, and then vaulting off the ends of your toes and gliding your rearfoot back. This doming on parade, for our purposes now, is only going directly forward and directly back.
You could also take it on different angles. Hours of entertainment. Now hold your shin up parallel to the ceiling and press through your heel, through the metatarsal heads, reach your toes long and then make a fist with your toes and pull back. Articulating at your ankle and at your feet and your toes, getting into the groove with the motion of your pelvis and spine, rocking and undulating a little bit. Reverse direction, make a fist with your toes and as you do this, you could sight down, take a look down from the tibial tuberosity, to the shaft of your tibia, having the idea that you can align your third toe with the shaft of your tibia.
Now grab in, fling out, grab out, fling in, grab in, fling out, grab out, and now you change that up to go through plantar flexion. Spread your toes. Plantar flexion and dorsiflexion. Let's come to standing now. In standing, rub your palms together and place the heels of your hands on the bones of the front of your pelvis, your ASIS and the pads of your fingers, midway between pubic bone and navel.
It's as if you were encouraging the girdling of your deep abdominals. Not gurgling, girdling of your deep abdominals. Now, without going backwards, lift your toes up. The tendency when we dorsiflex or lift the toes, the tendency is to shift the central axis backward and then lift the toes up. There will be a better abdominal connection between your feet and the area between pubic bone and navel if, when you keep your current axis central, balanced on your forefoot and your rearfoot and then just lift your toes up and of course, lifting the eyebrows could be helpful also, maybe.
Now, without going backwards, hover your heels and then without going backwards, reach your heels down. Once the heels touch down, the tendency for most of us is to shift the weight back, to rock the central axis backwards. Instead, find one axis, one setting, where you can lift your toes up and put them down and lift your heels up and reach them down, without going backwards, toes up, heels up, toes up, heels up. Falling forward, maybe, is better than falling back, right? Toes up, heels up, toes up, heels up.
Now, this is, these are stealth abdominals exercises. You can do them standing anywhere, anytime, provided that your shoes allow your toes to dorsiflex and everybody will be so busy on their phones, they won't notice that you are activating your abdominals and making a strong connection between your feet, through your pelvis, and through your spine. You might note that when your gaze is down, gaze down a little bit, it'll be easier to feel the abdominal connection of toes lifting, the abdominal connection from feet to this area. However, if your gaze stays down, it might be difficult to lift your heels and not go backwards. When your eyes are a little bit up, eyes a little bit up, it'll make it easier to lift your heels up and your whole spine going up, so then you can make yourself a little crazy.
Eyes down, eyes up, eyes down and eyes up. But the important thing is not to be delusional, don't say oh, I'm so busy activating my abdominals, when actually all you're doing is rocking back and forth. It's important just to have one central axis. Now after you've practiced your standing abdominals, you can take some doming on parade. So the same doming that you practiced when you were seated on the mat can go forward now.
You might bend your supporting knee as this foot goes forward and then vault off the tips of your toes to bring your foot back, appreciating the connection from your feet to your abdominals. And then take doming on parade with the other foot, going as far forward as you can reach and then bring yourself back. So much benefit to stimulating the proprioception, the alignment, the activity of your feet, your ankles, especially using your own hands. Thank you so much for joining us. I'll look forward to being with you next time, bye now.
The Teacher's Corner: Focus on Fascia
Comments
Thank you so much for your gentle and sensitive but deep work. Always an inspiration!

connection🙏

You need to be a subscriber to post a comment.
Please Log In or Create an Account to start your free trial.


