Description
About This Video
Transcript
Read Full Transcript
Okay, well, for this section we're gonna primarily be focusing on the spine. And if you have a wall that you can use and put your feet up against it's nice for this part, it's obviously not necessary. You can certainly just lie on the back with your feet on the floor. I like it, it brings me back into this memory of the feeling that we created from standing, and for a lot of people it's just nice because the way that the thighs more easily can sink back into the back of the pelvis, and the back is relaxed. Certainly there's many other ways that you can arrange yourself to get that same effect.
But here we are once again, connecting to our feet, the sacrum, the shoulder blades, the occiput, relax your mouth, relax your jaw, relax your arms down on the floor, and take some nice breaths arrive. And for this section, we're gonna just start with Eve's imprinting, because there's no better way to start this one. We'll just do a very simplified version of it. I'll review for those of you who may never have had this wonderful experience. Eve's imprinting is a way to really connect deeply into the deepest part of yourself, the core of you, through the picture in your mind of your spine, through any kind of sensing that you can get to.
And here's how it goes. If you can literally picture your spine, that's nice. Otherwise just kind of in a general way, think it. Relaxing over and over the weight of your body on the ground and allowing yourself to just release into gravity. So when you inhale, your spine floats up toward the front of your body.
So in this instance, toward the ceiling, and then on your exhalation, you allow the spine to release back down, and settle more into the back of your body. Breathing in the entire spine as it is in your imagination, floats up. And then as you exhale, it releases back down. And in the beginning it's, it may seem a little elusive. I'll give you some imagery.
She used to talk about it's as if you were walking in wet sand on the beach. And as you walk, if you were to look behind yourself, you'd see this imprint of your feet. And it wouldn't be because you had pressed, or pushed or done anything in particular, it's just the natural weight of your body and gravity. So in this instance, that's the same thing. You're not pushing or lifting or doing anything muscular that you can be really aware of, but it's happening.
So on the inhalation, the spine floats up toward the surface of your body. It's subtle, it's happening at a very deep, subtle, tiny, tiny postural muscle level. And then on the exhalation, it floats back down. And there's another image that I like to play with which is it's almost like the ghost spine. So when you breathe in, you kind of have this sense that the ghost of you would be floating up.
And then as you exhale it recedes back down. So we'll take just a couple more breaths here, inhaling allowing your spine to float up toward the front surface of your body, and then as you exhale, allowing that to release back down. And depending on how much time you ever wanna take in your own practice, you can separate into the segments of the spine. So we'll do a quickie. We'll focus first on the tail, the coccyx, and the sacrum area.
So sending your breath as best you can simply into that area, breathe in and imagine the tail and the sacrum floating up and on the exhale, releasing down. Inhaling through the nose with the lips closed, you could employ what Eve called candle flame breathing. Which is that when you exhale, you blow gently through the lips, softening the mouth, and it's as if you are bending the flame of the candle. You don't poof it out quickly. And what I find is it's a nice way to direct my breath if I'm trying to send it to a particular area of my body for attention.
So let's try that breathe in through the nose with the lips closed, allowing the tail and sacrum to float up toward the ceiling, and then on your exhalation, a gentle blow (blows gently). And then let's come up into the mid section of the body, the lumbar area, the waist, breathing in allow the spine in that area to float up, and exhale, blow (blows gently). And it's important with regard to the lumbar area not to overly push. Another reason why it's nice to have the feet on the wall and you can always take your hands under your back. If you have more of a space there, and it's a little too elusive for you, and just it's nice, it's kind of comforting.
Breathing in, and then you have your fingertips there to receive the weight without feeling this confusion about, well do I push? Does it touch? Does it not touch? It's a gentle wave like motion. Inhaling through the nose, and exhaling (exhales heavily).
And then coming up into the thorax, the ribs, breathing in, and exhaling allowing the spine to release back down through the center of your body onto the mat or the floor. One more in that area. Inhaling the spine floats, and exhaling (exhales heavily) it releases down. Similarly to the lumbar, when you come up into the cervical spine, again you don't wanna be pushing into the neck. So it's nice if you've take your hands, your fingers gently along the sides there.
It just gives you something to make contact. Inhaling and exhaling releasing the jaw (exhales deeply) and allowing the neck to relax back into your fingers. So when you practice this, you can certainly make as many little segmentations as you like in your spine. We're not gonna take the time for that today, but it's certainly fun to explore. Let's do one more general until the entire spine.
One of the things that's important is this is an exploration of yourself. This is an exploration and a curiosity about what's happening with you today, right now in your own body. Trying not to have an expectation about what should be happening. So as you're doing this exploration and this trip from the tail all the way up out through the neck, and you find areas that don't necessarily have what you might say is flow or suspension or movement, don't force it. You could stay there a little longer.
You could take some extra breaths. It's up to you. And often I find that if I hear of an area where I feel there's a lack of connection, or a lack of sequencing sometimes all it takes is just giving it my attention, and then it will respond. And it just takes time. So we're gonna move back now into the tail and the head connection.
So breathing in and breathing out, allow the tail to curl, and allow the chin to float up, and then reverse that allow the chin to float down, and the tail to release down between your legs. So breathing in, tail curls up, chin lifts, breathing out, releasing the tail back down and the chin will follow. And again, you can start this at the tail or the head. You're getting the nodding, the releasing at the occiput, the releasing at the tail, and it passes through the sacrum, and you feel the weight shift through the chest. As you go up and down, it's a natural spinal wave.
Tail, the sacrum, the bottom ribs, the blades, the neck, and head, and then back and forth, back and forth. Again, whatever sensation that you have with your feet that can be helpful. But just see if you can come into this gentle rocking. Allow your breath to be smooth, inhaling, and exhaling. You don't have to particularly time it with one breath here and one breath there.
Just allow yourself to play and feel this motion gently rocking through your body from the head to the tail, from the tail to the head. Taking it small enough so that it can be delicate and sensitive. And then the next time your tail rolls up, put a little extra weight through the feet, roll through your sacrum, roll through T12, roll up onto the shoulder blades, and then reach your arms overhead. If you can, get the tips of your thumbs to the floor, and then segment by segment, keeping the arms reaching overhead, release yourself back down, opening through each vertebra as best you can, remembering your imprint not pushing through the lumbar, and reaching the sacrum back down toward the wall and then bring the arms back down by your sides. And that just feels so great.
We'll do it again. Let's do a couple of small ones. Tail up, chin up, tail down, chin down, tail up, chin up, tail down, chin down. And then here we go. Rolling through the tail, the sacrum, meet yourself at T12, roll through the ribs, the shoulder blades.
Feel the release of the occiput and reach the arms overhead. If you can, take your thumbs to the floor, it's a nice guide. And then lengthening out from the shoulder girdle onto the fingers, roll yourself back down. Reaching the sacrum, away from the lumbar, settling yourself back down onto the carpet, bring your arms back down by your sides. And then go ahead and come up and just roll onto your back.
Arrange yourself again, feet. Now you're getting probably pretty good at clicking into those verticals and horizontals. Primarily the vertical right now. Let's do it here a little bit. Tail to chin, chin to tail.
And start to make it a little faster until you start to set up a real rock, and you may feel this in your feet, your heels pushing back and forth allowing it to sequence and free through your body as best you can. Feeling the breath move through your body, softening the jaw, softening your facial features, and then begin to roll. I'm not gonna go quite as far maybe as you because of the headset, but see if you can actually employ that. Chin up and down, the brain roll, everything that you've been practicing and fooling around with. You've called this zigzag head.
And that was a bit of a reference to the old sewing machines and the zigzag function on the sewing machine. So that's what that reference is. Just rock and roll, allow the chin to go, allow the head and neck to go. Enjoy the freeing up the release of the nervous system. The effect this has all the way down into your spinal cord.
Let go, let go, let go, let go. (exhales heavily) And then just come back to the middle, and then just let that go. I want just show you this. If you do have the wall, what also feels really great is if you lie down with your back to the wall, and reach overhead, and you can use the push into the base board. You get that same rocking going, but now instead of only having the push through the feet to give you this nice freedom.
You can also use the arms pushing into the baseboard. kinda like being on the Cadillac, and using the chrome poles, except this is more of a direct shot right above your shoulders. So, it just feels good. Gives you some more connectivity, opens up a few more channels and it's nice. Okay, so now we're gonna come back onto the back.
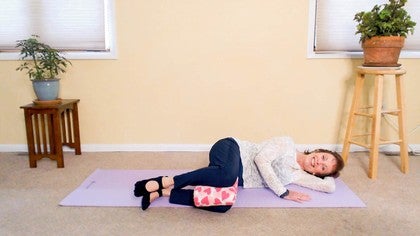
All right, so we have had mostly everything in this vertical track so far today. Now we're gonna go into the lateral, getting into our horizontals a little. There's so many ways you can do what we would call knee sways. But for this moment, I want you to focus on the shift in the pelvis. So breathing in, allow your pelvis to shift off to the left.
And then as you exhale, come back to the center. We'll try that to the right. Breathe in, the pelvis shifts over to the right, and exhale, come back. And so, because we're focusing primarily on spinal rotation here, watch that you don't let your legs drop, that your legs get heavy. So you wanna keep the knee as best you can.
The thigh, as we were on the wall, centered in the hips. So the focus here is on the lateral roll of the pelvis itself. Beginning to bring in a nice little bit of spinal rotation. Inhaling to the side and exhaling to the center. And then if you can, add weight in the opposite shoulder.
So as I take my knees and my pelvis off to the right side I wanna breathe a little extra into my left shoulder, and even let my head roll over to that left side. And then exhale, come back to the middle. Same thing to the right. Head, shoulder, right, pelvis left. And what that does is it keeps it from being too much of the rotation just in that lumbar spine.
If you can play with this for a moment you might notice when the head goes opposite, and you allow the same side shoulder to stay heavy, you might start to feel the rotation sequencing up a little higher in your body and your spine. Again, crossing through T12, and actually making that communication, that connection through the sternum, and then the back of the breastbone in the spine back there. And then what's really fun is if you can put it all together. So come to the middle, shake it out for a second. So, as the pelvis shifts over to the right, and your head shifts to the left, stay now, and curl the tail and lift the chin.
And then roll through the center. The head will roll to the right, as the pelvis shifts to the left, and then allow the chin to go down, and the tail to release through your legs. And then shift the head to the left, the pelvis to the right, and keep going in that fashion. So tail up, chin up, shift to the side. Chin down, tail down, shift back to the middle.
One more in this direction. Over to the side, tail up, chin up, roll through center, shift to the side, chin down, tail down. Now let's just stay there and reverse directions. So curl the tail, lift the chin, roll through center off to the side. So now you're off with your hips to the right, and your head to the left.
Roll the chin down, roll the tail down, roll through center off to the side, and a couple more in this direction. Some people feel this more as two circles creating a figure eight through the body. And some people feel this more as rectangles. It's up to you. Finish it up.
This is a good one to practice. Come back to the center, push and pull through your heels. Come back to the middle for a moment, and let that just go. And then we're gonna roll on to our side, and come onto the belly. So arrange yourself as comfortably as you can on the front of your body, extend your forearms out so that your back is relaxed.
Have your legs outstretched behind you (exhales deeply). You can wiggle a little bit. And then we're gonna replicate some of that wave but in a prone position. So breathing in, and as you exhale, tilt your nose down towards your belly button, and your pubic bone up towards your belly button. Stay there for a little breath.
And then on your next exhale reach the pubic bone away from the belly button and the nose away from the belly button. And then again, breathe in, breathe out, nose to belly button, pubic bone to belly button, take a little breath. Pubic bone exhaling releases away from the belly button as the nose releases away. And you can feel if you play with this when it stops being nose, and turns into tension in the back of the neck, and when it stops being pubic bone, and turns into tension in the lumbar spine. So find your way with it breathing in and breathing out, nose and pubic bone toward belly button, nose and pubic bone away from belly button.
Obviously working our way into a little bit of extension here. One last time. And this one, nose and pubic bone toward belly button. As you release your pubic bone away from your belly button allow your knees to bend. And then as you take the next breath, and the nose and the pubic bone curl toward the belly button let your legs come back down.
Let's do that one more. Inhale (inhales deeply), exhaling release the pubic bone and the nose away from the belly button and bend your knees, and then stay here, and just let your knees sway side to side. Let your head sway side to side. And then let that go, and we're gonna come up onto all fours. So again, arranging yourself depending on your proportions, finding comfortability here.
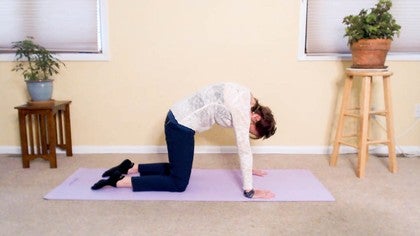
Six limbs remember head tail, arms and legs, and then we're gonna take Eve's old gray mare. Many you think of this as Cat-Cow. Again, the distinction for her when she taught this one for me was very much spinal. So you breathe in and on your exhalation, you reach the top of the head and the tail away from one another, as far as it can go until it starts to turn in the other direction but it's still tail and head not neck and lumbar. And then inhaling, elongate sacrum and skull away from one another.
And then add the top of the head and the tail curling as close toward one another as possible. Breathing in go back through that elongated state, and then exhaling top of the head tip of the tail. It's more like you're using a fine point magic marker, than a big thick one. Breathe in, lengthen sacrum and skull away from one another exhaling top of head, and coccyx curling toward one another. And then come to the neutral position.
And here we have the donkey wags. So, breathe in, elongate skull, sacrum, head tail. And then as you exhale, you look over your shoulder, and that same hip lifts to try to come in, and you look over your shoulder at your own hip, and then inhaling come back to the middle sacrum and skull away from one another, exhaling top of the head and tail curving sideways. See if you can do this, we then come back to the middle keeping pretty much your weight even. Try to avoid shifting off to one side so that it's truly more spinal.
This one gets its name from "Winnie-the-Pooh". And if you don't have "Winnie-the-Pooh" in your cultural experience I'll just tell you there was a character called Eeyore, he was a kind of a gloomy guy. He was a donkey and he was always losing his tail which is sort of nailed onto his backside which was probably not that comfortable. But he would always lose his tail, get caught on things and he would have to look and see, where is it today? Last one, exhaling as you curl and look over your shoulder, inhaling, come to the middle shake it out and relax for a moment.
And let's come into a Child's Pose. So, toes are together, heels are apart, extend your arms forward. And again, reach the sacrum and the skull, the occiput, away from one another. Using the strength of the reach of your sit bones backwards, and the reach of your shoulders onto your arms to get some length. If you're very flexible, just careful that you don't collapse down into your joints but keep a little sense of suspension here.
And then let's walk both hands over toward the right thigh. So that essentially your chest is looking out over your knee. And as you do so, keep reaching more through the left arm and the left hand, and maybe you're gonna feel a bit of opening and lengthening through the left side of the spine in the back. Take your right hand to the side somewhere next to your right knee or shin, and let the elbow bend. And then when you're ready, take another breath and use your hands and your arms, almost like a steering wheel to start to bring some rotation.
Some twists into the spine. Be gentle, feel connection again of the hands through the arms into the shoulder blades, and maybe bring the sternum around. Get a little bit of twist in that spine. Take a nice deep breath. Maybe you're remembering a little bit or thread the needle, and then reach the arms long, walk through center, take a moment in the center, and then walk yourself out over your left leg.
The right arm will reach longer. Stay relatively even in the pelvis, probably feeling a bit of stretch or elongation on that right side. Take the left hand to the side of your knee and shin. The elbow will bend and then again, use your hands and your arms like a steering wheel to lengthen and rotate (exhales heavily). Wending your way through, feeling the connection of the shoulder girdle, helping to rearrange your ribs and spine.
And then take both arms long, walk back to the middle (breathes heavily), take another breath, and then bring the hands under the shoulders, straighten the arms and come on up.
Mindful Movement: Moving Meditation
Comments
You need to be a subscriber to post a comment.
Please Log In or Create an Account to start your free trial.


