Description
About This Video
Transcript
Read Full Transcript
Hi, everyone, we're back for class number two of our Wunda Chair Progression. So I hope you feel good after class number one. Class number two involves a little bit more strength focus, little more bringing in obliques of the abdominal wall here and some unilateral things. So it's not always having two hands or two feet on the surfaces. What that does, gives you more challenge.
Okay, let's go. We're gonna start with footwork, all right? So everybody get yourself set for springs. Again, I've got two low springs set up for my foot work, that works for me, and let's bring your pedal down. And a quick review from what the kind of main nuggets were from class number one is relationships of the feet to the seat, okay?
Hands to the back, the spring. So when the spring is opening, I like us to inhale. When the spring is closing, I like us to exhale. All right, we're gonna keep that theme going. But today for class and in this one, for the arm position, let's put our hands on our ribs.
Okay, so you're gonna actually feel your ribcage move when you inhale and move when you exhale, here we go. Inhaling, pedal is down. Exhale, pedal is up. I want you to feel how your ribs actually move closer together. Inhale, they move away from you each other, exhale, closer.
10 times. Long spring, shorter spring, five more movements of the legs. So your hands hands are near your ribs, right? You're feeling your ribs open, close, the muscles responding to the breathing. Two more, pressing through the balls of the feet.
Pulling up to the seat, one more. Press down with the legs. Change the foot position to the arches. Once again, a little bit of space between the feet and knees, spring is open. This is our breath in, close.
Pull the heels, the feet to the seat, inhale. Exhale. You get it. I want your hands to stay there so you feel your center body relating to the breath. If you're having trouble sitting here, I should have said that you can put a little sticky pad underneath you but stay with it.
We're trying to build some strength, guys, inhale. Exhale, two more. One more. Exhale and push down. One more position of the feet of the heels.
Okay, same thing, inhale, the spring is open, exhale, close. Keep going. Okay, so that breath I'm doing kind of more audible so you can feel it, you can hear it, feel the rhythm of it. Feeling the rhythm of the ribs, last three, and close, push the heels away from the seat. Pull the heels up to the seat and one more heels away from the seat.
Heels up, everybody hold the heels up. Sit tall, pull your center in, pull yourself up. Okay, and rest. Good, now let's step off. Turn around, we're gonna keep the springs as is.
We're stepping up on the pedal and we are gonna work our feet and ankles, okay? So step up, tippy toe, hands at the back of the chair. Look at your feet, align them so you're evenly weighted across big toe to heel and baby toe, heel is behind the ankle. Now I want you to shift your weight, everybody, so your arms are over your wrists. Recurl or curl into your tailbone under, head in, right?
Inhale where we are here for just a moment, exhale, just stay here. Both heels down and up five times. We're gonna inhale down. What if that was the spring pulling down, and exhale pulling up, four more. Same focuses.
Trying to round the lower back. Keeping your shoulders over your wrists. Emphasize the curl of the tail. Exhale, pull the heels up, one more with both heels. Now let's separate the movements.
I want you to lower one heel. The other knee bends forward. Feel this position for a moment. Keep your shoulders over your wrists. That's an inhale, let's exhale, pull up, other side.
So it's not really moving forward or back. Arms are where they are, weight is over the arms just steady. Now you're doing the foot and ankle movement. Go into the breath again, inhale. What if you were stretching a spring?
Exhale, pulling the spring up, pull your body up inside. Lower the heel, pull up a little faster, down. Pull up, down, pull up. I'm saying pull up because we are working toward the idea of pulling the pedal up with the strength from inside our body, the relationship of hands and feet on our surfaces. Last one here, and then step back carefully.
Lift the pedal and then lower, lift your body up. Okay, good. Taking one spring off. So reach behind, I'm going into that standing push-down that we did from class number one and I'm going in same spring on this one which is one low spring. We're coming back around the front of the chair but this time we're gonna take away the use of two arms at one point.
We'll do three reps of each, two hands first. And then when it comes to one hand on the pedal, here's the shape, this hand will be on the pedal, this arm is around you, okay? Here we go, first though is two hands. So rounding down. Inhale the pedal down, just like we've done.
Exhale, pedal up. Two more. So fewer repetitions, you've gotta dig into the work of it. One more with two hands on the pedal. We're gonna stay upside-down, wrap one arm around your waist.
Feel your body pulling away from that arm. Now with one arm only, this starts to invite some work differently around your abs, your oblique muscles, your waistline, your sense of balance. Okay, two more, inhale down, exhale up, pull into yourself. One more, inhale down, exhale up, switch hands. Three on this side, inhaling down.
Exhale, can you curl that tail anymore? Two more. What does it feel like with one arm only, right? A little bit different, hopefully a lot different. Curl all the way up and everyone roll up to standing.
Okay, wonderful, I hope that was feeling good, and going on to feeling better now into teaser. Don't change the springs. We're not gonna move the pedal yet. We're moving us. And what I'd like to do here with this teaser is have you sit right at this front edge or the back edge in this reference to the chair, okay?
Hands on the corners. Let's get the feeling of it. We already found it in class one when we were on the floor and I was saying you're not gonna push the pedal with the arms, now there's no pedal. So we have to really go in to curl this tail, these sitting bones under, under, under, okay? Now my legs are a little short.
So I kind of come up on my tippy toes, not to worry. I'm thinking about what my tail's doing and my pelvis. I'm rotating hip bones back, tailbone under. Get into the position, look straight ahead. See if you can keep rocking back, everyone, onto your sacrum, hold onto the chair, hold on.
Get onto your sacrum and into your lumbar. Bring your knees closer to you, okay? Hold there. Can you keep that feeling and rock back up to where we started? Let's try that all again.
And go, rolling under, rolling under. See how far back you can go until you have to bring your legs up. My arms are strong, they're straight, I'm holding on. I'm gonna hold on tight with my hands. Get that position, your sacrum is flat.
Your lumbar is starting to get on that chair, right? And curl your way up, try not to use your arms. Use your torso. One more time, breathing in, and curling. Okay, we are gonna add to this one.
So I'd love for us to get back on that sacrum. Get back onto your lumbar. Arms are nice and long, exhale the legs up. Okay, stay with it. Extend your legs to your teaser line.
Now, let's bring the body, the upper body toward the legs just a little bit. Upper body, you're on your sacrum still. Hold on with your hands, it's completely fine. I want you to hold so that you can get the tailbone under more, get onto the sacrum a little more. And then if anyone feels ready to let go, try to let go.
Let's just hold for three, two, and one hold on, and exit the exercise. Good, okay. The last exercise, that single arm pump and teaser, really kind of nice blend so that you start to feel these relationships, right? The sides of the waist into the center and how that can help open up your back. All right, so now we're going into Swan on top like we did in the first class, we're adding a little bit more with this one.
So you can stay on one low spring, everyone. You can also amp it up to one middle. I'm gonna stay one low for right now. I'd like us to get behind the chair. Get close to it, put your hands on the chair.
Step back and let's see if we can get ourself on our stomach on her hips in one nice movement like that, lower your body. Put your hands on your pedal and once again, push it down. Sometimes the transitions are the exercises. So you'll see a couple of those too. Before we upper-body lift into Swan let's connect the hamstring muscles, the back of the legs, like you're pulling the back of the legs up to your seat, right?
Pulling the back of the legs, up to the seat, pulling the back legs up to the seat. And now use that and lift your legs a little bit. They're not gonna lift much on this. Now the upper body that you did in the first class, upper body goes down, legs press up. I'm thinking of bringing my legs up off the chair and down, lifting the chest, not going high in the chest.
I'm thinking about reaching my chest toward that wall in front of me. Little seesaw that we're starting to build here. As you're going down right now, don't bend your elbows, don't bend your elbows. I want to see what you can do with your legs, two more. I should say that differently.
Try not to bend your elbows. They're gonna bend a little. Let's focus on the relationship of the back of the body, legs and upper back. Okay, everyone, leaving the exercise, round your back a little bit, roll up to standing. Okay, feeling the intensity a little bit more in this class?
The intention is that. Okay, moving on to kneeling mermaid or side bend, okay? So again, I've got my pad and I'd like to keep it on one low spring, kneeling. Remember what we said when we did kneeling arms before, hand in the middle of the pedal, bring your pedal down. Bring that down.
Now, two choices here, you get to choose how it feels in your shoulder. We're all different. You could have your hands face forward, your fingers, or your fingers face in a little. That works well for me today. Here we go, arm raises up, hold that spring down.
Let's go back to the breath, inhaling, is that spring open? Yes it is. Now we don't close the spring on this exercise. We close the feeling of the contraction in these muscles here, exhaling, okay? Now stay for another breath in.
I bet you can pull the spring down a little more with the breath. There it goes, and now when we exhale, the spring up a little bit. Four more for a total of five. So this breath is back into the springs. Inhale, spring opens.
Exhale, spring closes. Inhale, spring opens. And exhale, spring's up. Inhale, it opens. And up, and bend your inside elbow and everyone come all the way out of that exercise.
Great, we're gonna turn around to do the other side. You're gonna see the back of me, that's totally fine. Okay, good, so the beginning of this exercise is the breath cycling is just a little bit different how I got you in here. So hand in the center of the pedal, fingers either forward or a little bit to the inside. I want you to bring it down first.
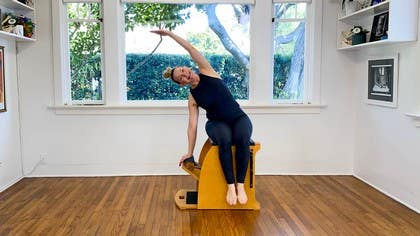
Feel the spring, the relationship of your hand pulling the spring open and how that feels in this part of your back, should feel really strong. Arm comes up. Now, I want you to inhale slowly, get your body bent to the side, okay? Now breathe in even bigger, this is where it starts. We pull the spring down or open and we get to exhale, pull the spring closed a little bit.
Inhale and exhale. Going over to the chair. Going toward that spring. Body goes away from the spring, spring comes away from the body a little bit. Lots of dimensions.
One more time here, moving the spring with the breath, controlling it back home with the breath and bringing your hand up. Okay, great, let's move on to some standing exercises now. Standing, press down. Okay, we need a spring change for this one. So you can put your pad away.
I am going to keep the one on low here and then the other one on low. All right, standing in front of your chair, this could feel heavy, that's okay. Step down, we're building strength, okay? You felt this in the first sequence of classes, bring this pedal down, it's pretty heavy, everybody, work with it. Focus, now what we're working on is a weight transfer.
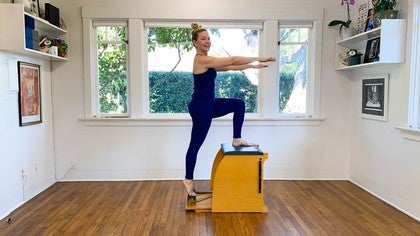
I want you to rise up to a little tippy toe, put your hands on the chair, round your back. Bring this knee tightly up to your chest and step your foot right on the chair. Lift yourself up like you're gonna sleepwalk right out of the room, arms are facing forward, body is tall. Feel how your feet are pressing down on the surfaces. You should feel your seat contracting.
Let's get out of that. So hands come down, get the foot off the pedal by really bringing your knee to your chest. Curl yourself, foot down, release that pedal with control. Only three of these, this is intense. We pull it down, inhale.
When the spring goes up, exhale. Although there's no spring coming up, we're moving up. Lift your body. Standing tall, rounding down, try to get the tail to curl, knee to the nose. Step the foot down and bring the leg up, one more time.
Press, rise, hands, knee to nose, foot to the seat. Lift up, hold this position. Just feel this moment. Not today, next class, or soon we will be doing a full step-up. Don't do it yet.
Okay, and then let's come down. All right, let's check that out on the other side, three times, all right? Keep the feeling of the seat to the feet. Step your left foot up or your other foot. Press it down on an inhale.
Rise to a little tippy toe, your balance is probably starting to get challenged a little bit. Put your hands down, nose and knee come close together. Round your back, place your foot on the chair seat. Knees should be over the ankle. Rise up in your body like you're sleepwalking.
Who could do that? Do this Pilates work, hands down, now to get this foot down, really pull up into the diaphragm, use the breath, foot down. Pedal goes up. Inhale, pedal down. Rise tippy toe, transition right into hands, knee to the nose, put your foot down.
Slowly articulate up to this kind of standing torso position, and then round back down. Stay curved in your spine, curved in your tail. Lift your knee to your nose, place your foot down and pedal up. One more time. Pressing down.
Balance, control. Change that body position from down to up. Look straight ahead, stay here for a moment. Press your feet down more on your surfaces. Feel what might happen.
There might be a little up and then we're coming out of the exercise, okay? And then everyone step down, release that pedal, and then turn to face the side. Now we're not gonna do the turnout version of the full up-down, but I do want you to feel something. If we just step to the side and pull one foot up, remember that Farmer John exercise from class one? This spring is too heavy for this exercise but what I want you to feel for just a moment is the relationship of this inner thigh to this one.
Put your hands on your ribs again. Let's take three breath cycles. We're gonna start to think about how obliques and abductors all kind of have a party right in the center of the body there, exhale, okay? I know it sounds weird. I'm thinking of bringing this leg toward this one and this one toward this one, these obliques to these obliques, these to this side, on an exhale.
One more time. Connections. Okay, just out on the other side. Just, that's a lot. Stepping up, you're in an external rotation.
Your pelvis is right above your standing leg. Both hips are rotated. Remember the hands on the ribs, let's take a breath. And is that exhale is if you're pulling your legs toward one another, your ribs closer together, inhale a little bit of opening, exhale and close. I'm really thinking of the relationships of leg to leg, waistline to waistline.
Okay, and everyone release and just step down and just shake your legs just for a moment there. All right, moving on to arms again, everyone. We need less spring, back down to one spring. This is where I'm gonna turn my chair on that little angle because I am. I want you to bring your knee pad out, okay?
Kneel down, remember where the hand goes, right in the center of that chair pedal and there, bring that pedal down. Place your hands in your quadrant pad. Now we don't need both knees down. I want you to stretch the outside leg back, think plank. Get on the ball of that foot.
Now you've taken away one knee for support. So balance could be different right now, you're good. Do like two or three just up and down pedal, maybe two. Okay, just feeling that. You've already done that in class one.
Please stay down with that pedal, press it down. Think about from your armpit. Take the knee that's on the floor and lift it up. Stand next to the other foot. Bring it back down.
Lift the pedal. Let's inhale, pedal, exhale, plank. Inhale, knee down, exhale, pedal up. Feel that rhythm, inhale. Stand in plank, knee comes down.
Exhale, pedal, twice more. Inhale, exhale. Inhale, exhale, one more time. Use the obliques that you just felt in the last exercise. Hold your legs together, oblique to oblique, waistline to waistline, and release it.
See how the classes are building in intensity or is it just me? I don't know, okay, second side, everybody. So we got to turn things around. Get that knee pad down, okay? And now let's go for it, we're gonna bring that pedal down.
Get right into that quadruped position. Outside leg goes out. Couple times, we did two just to test that pedal spring. Test that pedal spring, you're gonna hold it. Now, lift the knee that's on the floor up off the floor plank.
Bring it down. Now we add that pedal, pedal, leg, leg. I'm not gonna look at ya, okay? Inhale, pedal down, exhale, leg goes back and up plank position. Inhale, knee down, exhale, pedal up.
Two more rounds. Connect your legs together. Connect your waistlines together. Here's our last one, hand pushes the pedal. Step back in plank, we're gonna hold it.
I want you to feel your legs really working toward the midline, your waistline working toward that midline, that's plenty. Knee comes down, knee comes down, pedal goes back up. Okay, wonderful, shake your wrists, everybody. It's a lot of weight bearing there. We're coming out for Cat on top.
We've done Cat before, so I'm gonna spin my chair back around. Okay? Let's go change the spring. I would like you to feel a different spring for a bit. I'm taking this low spring, going all the way up high.
What that's going to do is give me more support and a little challenge on how I can regulate my body weight going over and back, okay? You'll see, you can put this down. Come on up on your knees. Just take a moment up here. This is the highest we've been on the chair for a bit.
So this is your balance is different. So remember the breathing, inhale wide ribs, exhale, a little bit of strength coming up into your upper belly, reach your hands down. Now there's different ways to get down. Today, what I'm showing us is rounding down. I am kind of crouching my hips down to my heels, that's fine.
There's other ways, this is what we're doing right now. I would like you to lean your body weight onto your arms. Where's the breath, remember, inhale when the spring gets stretched, exhale when it closes back in. Stay over, stay with me, keep going. As we start to feel more adventurous we start to keep our body farther out over the spring and we don't weight shift on the knees as much.
Learning Cat On op is interesting because we're upside-down, right? We're gonna do another upside-down one in the next class. This is a deep upside-down exercise. Two more, look back through the springs. Make sure you're inhaling, seeing that spring open.
Exhale, close, one more, everyone, inhale. Hope it feels good, exhale, close it all the way. Now, roll up, try to bring your hips forward. Bring your hips forward. And when you get better at Cat or more familiar with Cat, we actually try to stay like this going over.
It's a lot of work. Okay, let's move on to another lateral exercise. So I'd like us to go back down in spring, back down to the light spring. So we're gonna take high to low. Okay?
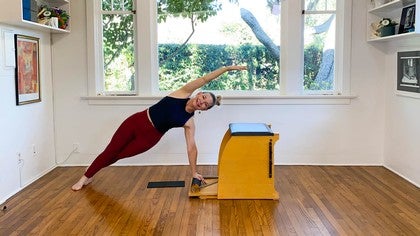
And we need to get right on the side of our hip here on the chair. I like to just sit. If there was a bullseye right there, I put my greater trochanter right on the center. Legs are in line with hips, please hold on. Where's your hand?
Needs to be right in the center. Okay, and just for a moment, don't go anywhere. This is plenty, be here. The crown of your head, like a big lateral arrow pointing to that wall, tailbone is to that wall. Breathe, the spring is open.
As you exhale, let's do a little bit of ear to shoulder, neck, upper-spine side bending. That's it, that's all the higher we're gonna go. Inhale, go back out to that long line. Exhale, ear to shoulder, upper spine side bending. Inhaling over, it's important to use your neck.
Three more on this side, exhale. What muscles do you feel? What part of your body are you starting to feel more now? I can't see your answer. I know you noted it.
One more time, side bend. Wonderful, okay, we're going to do the other side. Bend those knees, just curl your way up. Beautiful work, everyone. Curl around, hand in the center.
Press down, your legs are in line. I am holding on to the front of the chair for a moment. Be a beautiful straight line. I've got this windowsill I'm kind of looking at. So I'm lined up with that.
Spring is open, I'm inhaling. Now it's important to keep the legs engaged, reaching the legs from the hips. Here I go, ear to shoulder, upper spine bending to the side so tiny, inhaling over. It's almost like I'm trying to just come up enough to see the garden out front, that's all. And inhale.
Exhale. Can your neck lengthen on the way over and on the way up? We have one more. Yeah, so this class could have brought in, here we go, a little more of our side body muscles, side body muscles. We're not quite done, we've got two more exercises.
We're getting down to the ground again, everyone. Now obliques, right? We've been working here, we've been working on the side. So I want you to lie on your back. Look up to your chair, make sure your head doesn't bump the wood side and just start right now with your knees bent and feet flat.
All we're going to do is take the hands to the side of the chair. Now, if you're real open in your shoulders, don't go into it, don't let your elbows flop. I want everyone to actually kind of frame their elbows up. I'm looking straight to the ceiling and I can see my elbows. Lean your knees toward the right.
Let's focus on what's not moving and that's the upper body. But right now my knees are to the right. It's like these left obliques are connecting to the right obliques and those inner thighs again. Breathe in, exhale, return to center. Let's just alternate sides.
Knees to the other side. It's like obliques to obliques and inner thighs and exhaling center. Okay, you'll feel more obliques in class three. Three more of these. And then the last exercise we're gonna do everyone loves a good rollover in mat class, roll over.
On the chair, the way I'm gonna give it to it in this particular class in the series, you get to continue holding onto the sides, lengthen your legs up to the ceiling. Two repetitions is all you get, okay, how will we get, you can do three, but I'm gonna do two with us. So it's the tailbone curl is that rollover. I'm looking up, I'm gonna peel up, lift those toes and place them right on the top of the chair. Take a moment, curl your tail a little more.
Deep, deep breath in, now there's no springs. Connect the breath to your body. Roll yourself down. Okay, okay, I can't leave on just two. We've got to do three, curl over.
Inhale, along spring inside here, exhale upper abdominals. One more time, promise, and we go. Deep breath in, exhale and rolling down. Use the legs together, use the obliques that we've found most of the class today, all the way, all the way, all the way. Everyone bend your knees and just roll over to one side to finish class number two.
So I hope that felt really good and challenging in some new connections for you. Do this class a few times, or if you're ready just to jump to class three, wonderful, I'll meet you there, see you then.
Wunda Chair Workouts: Wunda Chair Fundamentals
Comments
You need to be a subscriber to post a comment.
Please Log In or Create an Account to start your free trial.
