Description
About This Video
Transcript
Read Full Transcript
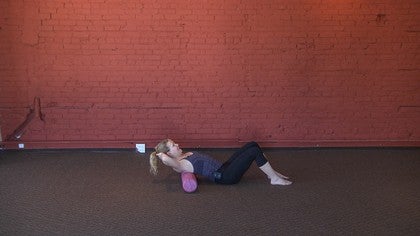
Hi, I'm Amy. I'm gonna do a s another foam roller, a little segment. I'm using my softer of the rollers. This is the pro roller. And just the last time we did more hip, really specifically hip stretching and hip joint work. This'll be more neck, uh, occipital muscles that suboccipital muscles, a little decompression for the cervical, uh, occiput area, atlas, Atlas. And then working into the back of the body just kind of pretty much through the base of ribs up. So intention there is to decompress. So let's take our rollers sideways and I'm going to have, you know, this is important and it's nice on these softer rollers. There are a lot denser, a little squishier. You can get comfortable. This will not, this is not in a cervical spine. You're not putting your cervical spine on.
The ruler is the back of the skull. All right. And if you know your bones, most of us I think know where occiput is that protuberance of the back of the skull. That's where I have my roller right there. Okay. So the goal here intended, I was to decompress and to just bring some hydration. And some circulation to the back of the the neck. And uh, this might be something to do, you know, after class or before a mat class or a session, maybe you have five, 10 minutes extra that you want to spend on just your neck area. So here we go. We have our, there are ox put on the roller.
I have my knees bent when a slightly posteriorly tilt my pelvis just a little bit. Take a couple of deep breaths.
Some of us have a lot more range of motion turning right or left. You're F you're learning about yourself when you do this. And what I want you to find is as you roll your head side to side at this right now, the rollers not moving. Okay? Shouldn't be ideally. So you may need to limit your range.
I also want you to notice that your shoulders aren't coming along for a ride. This is really just rolling across the back of the skull,
Very small. I'm choosing a head nod. You can do no circles. I learned both of those in my fundamentals. So what's this about? This is some bring in some juice, some more fluid fluid into this area, into the tissues. Well, it feels so good. I'm really now starting to feel it down in my of jaw and my upper trapezius.
Okay. Slightly press on the roller. Roll it to excuse me. The other side
That makes me smile because it feels good. I want to roll across the base of the sculpt. Apply a little pressure. I'm gonna go one more time.
You can see I have more now. Definitely on this side. Let's see what happens here. There is still that light pressure of your head on the back of the roller. But our goal intended is more range of motion, decreased tension, shoulders just falling back. And I'll do one more.
Just roll it behind and just feel my head on the floor. Oh my gosh. And it happens every time and love this. It's, it's, I feel like I've just fallen down to the ground. Like I've got a little more width and length behind my neck and that's the intention there to relax those, those muscles that sometimes get held and tight and can restrict some ease of movement at where the skull sits on the spine. Right? Which can kind of get a little Maggie. Okay. Now you could absolutely do that on the white rollers or the blue rollers that many of us have, but you'll, you might find a nicer relationship on the pro roller cause it's okay.
But if you liked the dense, go with the dense. So now I'm going to move the roller into mid ribs. We're going to do one more little mini section here and I've got it right at the bra line base of the shoulder blades. I'm gonna put my hands behind my head and support that that I just gave my neck. I'm gonna see how much length I have between my hip rib area and into my rib cage. So it's stretched.
Try to stretch my ribs over the roller that way long but not in a back bend, just more of a straight elongation. Okay. I'm going to check into it first and as then we go through, do a little bit of mobility through the ribs and sh scapula and upper back. We'll come back to this and see what, what else I have or what you have. Okay, so I'm feeling a fair amount but I would love a little more. So what I want to do again and place myself there, I'm going to start a little bit of rolling side to side. So same thing. I want to not move my roller but I'm moving on top of it side to side first.
Now I want the ruler to move. I want to move on top of it. It's getting, oh, I'm feeling something there. Yes. Some hydration. Again, bringing some fluid to an isolated area. For me, it's that mid thoracic spine. So a little bit of motion. And again, on this softer roller I met, um, I'm able to go deeper into the surface of the roller. So it's like I'm becoming more with it than before.
Now I'm going to lift my hips up and move this ruler up higher onto my upper back, near my sh tops and my shoulders, and then flush down. I'm gonna roll up to the top of my shoulder blades and move down. My hips will come down.
I'm applying pressure in an isolated area.
So I f I use this to follow from the cervical stuff so that the whole upper back is hydrated. Got a little more flow in my system in there.
Stretch & Release: Roll to Release
Comments
Kerry....glad you enjoyed the release!
You need to be a subscriber to post a comment.
Please Log In or Create an Account to start your free trial.


