Description
About This Video
Transcript
Read Full Transcript
So one of the aspects of the Fletcher work that sets it apart is springing the work to standing. And um, Ron flood sure purposefully brought the work just standing by asking Clara if he had permission to do so. He felt that clients needed more of a reference to the outside world, um, to how they came into the studio, how they left the studio. And it was one of the best ways for a teacher and also for a student to assess themselves and what they learned during the hour. Um, so one of the most frustrating things as a pilates teacher, as many of you know, is we have our clients and we spend so much time working on their alignment, on placing their bodies, on having them feel specific parts of their bodies. And then they leave the studio and they go into a schlump. And so they walk out to the car and they're the bags on one side.
The shoulders lifted and what Bron did for us and for his community. And for those of us who continue to study and teach his work is take the work, learn how to take the work with us. And part of that is through the standing and centering cues, which is very simple but also very difficult to do. Um, uh, I mentioned that he asked Clara's permission to, to bring the work to standing. There were several exercises in the original studio that were done in a standing position, um, on the pedal pull off the end of the Cadillac. Um, but there was very little attention to simply bringing the work to standing and holding the body still. And Ron felt that there was that more attention needed to be painted that, um, when he decided to teach the work. Um, after many years of study with Joseph and Clara Polonius, and especially with Clara, Clara Polonius towards CND, um, he asked Clara permission. He said, may I bring the work to standing? Um, and then may I take the movement into movement across the floor, which is something that, that he developed based on the [inaudible] principles.
Um, Clara's response to him, um, when he asked her, this is, and this is a quote from [inaudible], there is far to go with this work. This is just the tip of the iceberg. This work is in your blood and you are the man to create and develop it. Go and do I love that. Go into just always remember your abcs.
And so Clara understood that Ron and knew what the ABC's for and the abcs. We can also relate those to the Palladio's principles. They're the foundational concepts of, of the Polonius method. Um, and Clara knew that Ron understood what those were and that he wouldn't somehow take the work off on a tension by bringing the work to standing or turn it into a dance technique. Um, this is a wonderful quote from Ron that that relates to his, his ideas behind the standing and centering cues. This method can be applied to simply standing with each part of your body's inner architecture. And I love that idea of inner architecture, working from the inside out and correct alignment practice, just being and feeling yourself inside your brain and body, being aware of yourself and your physicality while standing impeccably and totally still. So standing still is, um, is difficult, being still is difficult to, it requires being present. Um, it requires quieting the mind, quieting the body and feeling what's, what's happening within ourselves. Um, it's, it's wonderful I think to bring our clients to that, that place of stillness before they move and then again bring them to that place of stillness at the end of each session. I'll never forget, I was with Ron in London, uh, for a workshop. It was about five years ago and we had a room of 70, 72 people and he had the group come to a standing and centering position, which she often did at the beginning of a workshop.
And there was fidgeting and people were, you know, sort of trying to get comfortable and, and moving their hair. And, and Ron stayed with the group until he had everyone in the room standing completely still. And there was a magic moment. And then after that magic moment, three people toppled. They just fell over because they weren't used to standing. Still. They'd locked out their knees. And um, so there's a real skill, there's a real endurance to standing still and that's what we'll go through. Um, now the, the Fletcher's standing in center in cues. So we'll go through the seven standing center in queues with David McMahon.
David, thank you for, for, uh, lending your body to this round. Um, so we'll start with the feet and we think about there being three points on the sole of the foot. One point at the base of the big toe, one point between the fourth and fifth toes, also at the, at the base of the toes. And then one point right in the center of the heels. So it's a tripod base, which creates a very, uh, uh, balanced place to stand from. And what I'll ask David to do is simply lift all 10 toes up. So he feels that tripod base into the floor and then lower the toes down to the floor. And again, lift all 10 toes up away from the floor. Really emphasizing the three points, and exhale, lower the toes down to the floor.
Let's do that two more times. Inhale, lift the toes. Ah, exhale. Lower the toes down last time, lifting the toes, ah, and lower the Cho's down. So we want to spread the weight evenly across those three points. But we also want to have the white evenly dispersed across the two feet. So if we're, if we're a hundred pounds, we would have exactly 50 pounds in one foot and 50 pounds on the other.
And I actually have a teacher who keeps two scales and her studio and she has her clients stand on each scale, making sure that they have equal weight into their feet, which I think is a wonderful idea. Um, the next cue that we talk about are called the magnets. So the first magnet would be right at the ankle bones drawing the medial malleolus together. And if you can't draw the, the client's ankle bones together, there's an image of a hinge going through the ankle bones so that there would be an even line. So if he was supinated roll out through the feet, he would see how you had been that hinge. Likewise, if he was more pronated dropping in through the arch, which is more difficult for David, you would also see a collapse through the outer ankle, suffering the balls of the feet together. So the first magnet would be right at the medial malleolus balancing the ankles. The second magnet is just above the knees, right at the Vastus medialis. And we want to think of lifting this magnet up.
So we're engaging the vastus medialis, lifting the quadriceps up, which in turn engages the third magnet, which is high on the adductors. So that chain of magnets, uh, relate to one another. If the ankle bones aren't aligned, it becomes very difficult to work up through the legs and then it becomes difficult to work up into the pelvic floor, the transverse abdominis. Um, so really all alignment as we know, starts with the feet. It's much easier to feel this in a standing position than it is in a supine position on the reformer. So we have the three sets of magnets and I'll just ask David to release his legs apart and then exhale, think of drawing the legs together and pulling up into the pelvic floor.
And again, releasing the legs apart and exhale, pull up into the pelvic floor. And let's do that one more time. Inhale, release and exhale, pull in and pin. We'll do a very simple play reaching the arms forward. And as he length and selects, he's not thinking of pressing into the backs of the knees. He's thinking of lifting up through the magnet.
It's really emphasizing that vertical length. And again, inhale, reaching forward. And exhale, press.
So that we're gathering our body around a central core instead of bearing down or thinking of of the core of the body being just through this region of the body. It's a different concept. Um, you might want to play with that in your teaching and see how that, see how that works for your clients. The next part of the body that we think about is, is the pelvis. So with the pelvis, we want to think about stabilizing the pelvis before we move the pelvis. And we think about bolting the pelvis in from side to side. So we have two lateral bolts and it's right at that the hipbones through the greater trow canters.
We're thinking of narrowing the femur bone into the hip socket, pulling in and out. And then the second set of bolts is from the pubic bone into the sacrum. Um, so really pulling the bones together and I love that idea of organizing the bones instead of working so much from the muscles because the muscles follow what the skeleton, what the skeleton does. So I'm going to ask David to come to a turned out position. That's it.
And then from here I'm going to ask him to move his bolts or move his pelvis to one side, pressing the hips out to the side and then pulling the hips back to center and think of pressing the hips off to the side, going off center and pulling the hips back to center. Let's do that two more times off to the side. And laterally I'm seeing that he's not shifting forward or back and pulling back to center. And last time reaching to the side and coming back to center. Beautiful. The next part of the body we talk about would be what's, what's related to employees, is the powerhouse or the core of the body. Um, Ron called this the girdle of strength.
And I liked the idea of the girdle because it's this idea of pulling in and up. So we're thinking about the, all of the soft tissue that's framed by the bones. So if we think about coming around the ribs all the way around to the lumbar spine in the back, and then coming around the pelvis all the way around to the pubic bone, this whole three dimensional cylinder would be the girdle of strength. And what we want to think about doing is not only, uh, it's, it's more about length than it is strength through this part of the body. So I'd like for David to simply settle down into his girdle of his strength.
That's it. And then think about lifting the rib cage up out of the pelvis and coming in and up. Beautiful. And then again, just released. So this would be the end of the day and this would be after Palladia session, pulling it in. And, uh, and again, couple more times. And, and, and that also relates to the magnets and to the bolts one more time, release and pull in. And um, so one of the things that Ron talked about a lot is lifting up and out of your hips. And he said that over and over, get up and out of your hips.
And that's what that means to really get the rib cage lifted up out of the hips and to create as much three-dimensional length between these two bony landmarks, six. So then we talk about the breath and we think of the breath as a postural cue because if we, if we have a tendency to breathe forward in the body or breeds back in the body, or if we're collapsed through the rib cage, it, it relates to the entire body posture and, and especially to the thoracic spine. So I'm going to ask David to breathe laterally and watch how that opens up his chest and then keep the chest open as you close the ribs and again, and think of breathing ladder, like spanning to the sides of the room. And then exhale, close the ribs, maintaining that like, and again, deep breath in, expand [inaudible] and as he draws the ribs down, he lengthens up through this fine. Nice. One more time. Date breadth in and ex hale. So very much like we're all thing the seven standing center in queues to feet relating to the midline of the body, pelvic stabilization relating to the girdle of strength, the breath and the shoulder girdle. If we don't get the Cuban niece, um, then it's difficult to get the cue above.
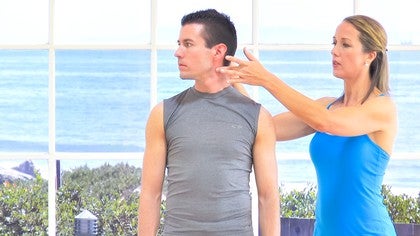
So we always want to start with the feet and then work our way up. So the next part of the body that we think about and let's turn to your back, is to the camera, um, is the shoulder girdle. So once we have the thoracic spine placed and we had the lumbar spine placed in the pelvis, we think about the shoulder girdle starting more from the scapula than from the shoulders. And so what I want David to do is elevate his shoulders up, lifting the shoulders up, and then think about pulling the shoulders down from the Scapula. Now I'd like to like for him to do that same movement and think of working more externally, more from the shoulders, lift up and down so there's less action through the bag. See if you can see that difference. Lifting up and pull the scapula down, feel that connection into the back and lift up, and then just pull down from here. It's a totally different action in the body.
Now what I'd like him to do is move the scapular way from this spine forward and then draw the Scapula back to center and then draw the scapula towards the spine, retracting, and then place the Scapula's center and to get away from the spine protracting and pull back to center. And again, pull towards the spine, build that retraction and find center. And one of Ron's favorite movements was what he calls finding the pockets. So placing the scapula down into the pockets. Lift your shoulders up, drop the shoulders, and then place the shoulders. So it's a double exhalation. Inhale, lift, draw and play. And again, lift up, draw and place. One more time. Lifting up, draw and lice.
And so most of us live in that default position, which would be just placing the shoulders wherever gravity dictates and what Ron was saying and what we teach is that we need to get that extra depression. Most of us in a little bit of retraction in order to feel the organization through the upper body, again, turns to you're facing the camera if you would. So it's the feet working up through the midline of the body, then going to the pelvis, working through the girdle of strength, focusing on the breath and thinking of breath as a postural exercise, placing the shoulder girdle, and then the next part of the body we think about as the placement of the head and the neck. Um, one of the things that frustrated Ron as he said with most Palase practices or most Polonius teachers that the spine started here and it ended about here. And really what we want to think about is the spine at the tailbone all the way out through the crown of the head. And then we can get that wonderful oppositional energy and really work the core through oppositional energy, not through thinking of strengthening the core.
So the head and the neck is, is um, is often overlooked and in [inaudible] practices, just that wonderful articulation that's available to us. And so what I'd like for David to do is to think about lifting up more through the crown of the head, feel the opposition from the crown of the head down to the tailbone. And then from there, just to a simple neck rotation, looking to the right, that's it, a clean rotation and then a full breath to come back to center and a rotation to the left
So this is a place where Ron would often add pulses. Just a very simple pulse just to increase that rotation and work on stabilizing the opposite shoulder. One more set, and then a full breath all the way around to the other side.
Lift up and feel that stretch. One more time. Lift up and press down. And then think of placing your head right on top of your spine, lifting up to the center and again over to the other side, a little tighter on this side. Draw the right shoulder up and increase the stretch and uh, and lengthen down last time up, pressed down, and then place the head right on top of the spine. Lifting up. And then let's just take some errands. So lifting up laterally. Inhale, lift and exhale.
Press and again lifting. Oh and exhale press beautiful. Two more times. Lift and grow taller as you press down. Last one, lifting and pressing down. And two, you're ready to get on the reformer. Thank you.
Pilates Legacy Project: Ron Fletcher Methods
Comments
You need to be a subscriber to post a comment.
Please Log In or Create an Account to start your free trial.
