Description
You can use this information in Tom's full Sitting Better class.
About This Video
Transcript
Read Full Transcript
Hi, everybody. So in this tutorial, I'm gonna show you some really useful information on how to guide yourself and your clients on how to sit better. Not just sit better, but to have it be comfortable and more efficient where they're not having upper body tension, and they have a way to self-correct. So one thing, lemme just show you the pelvis 'cause we, this is a big part of our sitting posture. So when you're sitting, and you're sitting with your head over your spine, you want to be up on your sit bone.
So this is the sit bone at the bottom of the pelvis. If the pelvis is tucked under, if I'm curled back, then I'm gonna be more on the back of the sit bone or the back of the canoe. If it's tipped forward, I'm gonna be on the front, I'm gonna probably have a little more lower back tension. This is not as common when sitting, we're usually more slightly back or maybe in the neutral, but this can also happen. So you wanna be more in the middle.
So then your head can be lined up over your spine. So just that in itself, allows you to be in better alignment with gravity. So the other key thing to think about is when we do this, what's an exercise called sit to stand is that you have to transfer, when you go from sitting on your sit bones to standing, you have to go from your sit bone to getting up on the top of your femur bone, which is like three inches above, three inches above the sit bone. So you're transferring from here to here. So that transfer has a lot to do with how we transfer out of a chair, how we hinge and the repetitive motion of that, actually has a lot to do with the health of our lower back and our movement habits.
Getting up and down out of a chair, we do a lot and a lot of times we don't think about it, but if we do it in an organized way, that can be a very healthy movement for our body and it becomes an exercise in and all of itself, it's really good for us. So the first thing we're gonna do before we do that is I just want you to feel your sit bones with your fingers. Feel where they are. Say, "Okay, now I'm sitting on my sit bones with my fingers." And you can do this with your clients. This is really helpful when you're gonna teach them stuff like sitting on the chair to do footwork or sitting up on the long box or if you're doing any exercises sitting, just give them that feedback where they are.
Now sense when you're a little behind them, sense when you're in the middle of them. Sense when you're a little bit forward, we probably feel a little more back tension, and find the middle again. Now we're gonna do something to stretch the pelvic floor, you can use a towel. Put the padded towel under one of your sit bones, on one side, and then lift the other side. And as you know, the pelvic floor is on the bottom of the pelvis and it will lengthen as you lower one hip towards the floor, as you breathe in. (deeply inhaling) Now use the pelvic floor to lift that hip back up.
(exhaling deeply) Inhale, lower, it spreads, it stretches, exhale to lift. The key thing when you're doing this or you're guiding somebody, that they don't use shoulder and neck tension to do it or drive too much from their leg. (exhaling deeply) Feel like it's coming from the pelvis to lift, (exhaling deeply) four to eight reps possibly. Then the last one, hold it, now keeping the hip in the air, fixed standing leg, rotate the pelvis forward and back around the fixed standing leg. Now you're moving the pelvic muscles, you're also getting healthy movement in the hip joint, on the standing side. Again, a reasonable number 6 to 10, lower, take it away.
Notice, "Wow, now I'm on my sit bones, it feels like a breeze." Now we'll take side two. So we're not just trying to improve alignment, we're trying to improve comfort in all positions in the body. When you have less tension, you're more aware of how you are. Now take that hip and lower it as you breathe in. Exhale to lift. (exhaling deeply) So I'm lifting more from the center line, the bottom of my pelvis, instead of just driving from my leg. (exhaling deeply) (exhaling deeply) Again, I'm just gonna do a shorter number, but do like 6 to 10.
Now rotate the pelvis forward and back. (exhaling deeply) You're stretching the pelvic floor, you're mobilizing the hip joint, which is also preparing you for going to standing. And then lower, take it away. Now you're prepared. Now when you, remember the sit bone is below, hip joint is above, we're gonna tip the pelvis. Bring the feet a little closer to you.
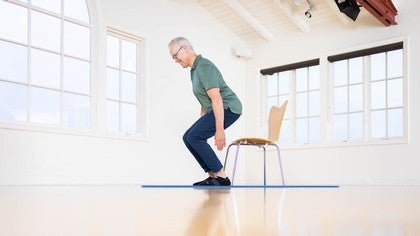
Tip your pelvis over your legs, let the torso hinge, and then hinge back up. And practice doing it without adding shoulder and neck tension or anticipating that you gotta use your arms, if possible, Go forward, now you're gonna shift the weight to that higher place, come onto the femur heads, now from the femur heads, stretch up straight, equal weight on the front and the back of your feet. Now lower down from the femur heads, and come back. We'll just do three more. Hinge, lift. (exhaling deeply) Hinge down with control, like you're riding down on the top of your legs.
So you're teaching good mechanics, alignment, efficiency, (exhaling deeply) and just one more. Hinge, this time, see if you can really relax your shoulders and neck. (exhaling deeply) Float it back down. Then I'll just take a moment to notice how your sitting posture feels now. So for me, I feel like I'm up on my sit bones. I feel more relaxed in my shoulders and neck.
And we really didn't do anything up here. We just figured out how to get the center of gravity lower, more on top of my femurs, feet on the floor. Sitting feels easy and balanced right now. So I hope you enjoyed, and check it out and play with it. Do it yourself in your own body, first of all, and then try it out with your students.
Thank you everybody.
Empowered Aging: Moving Well
Comments
Tom
You need to be a subscriber to post a comment.
Please Log In or Create an Account to start your free trial.


