Description
About This Video
Transcript
Read Full Transcript
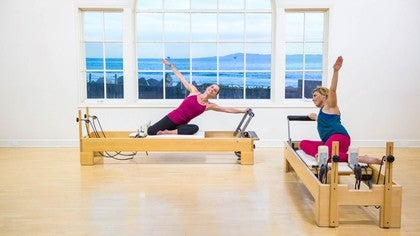
Hi. I'm Misty Lynn Cotton, and I am presenting to you today fortifying the reformer. We're starting from the bottom up today, and I have to tell you this is a I call it a fresh class. This is for people that are newer to the work or people that wanna touch in with the basics, but it's meant to feel good. It's meant to work from a more neutral place in terms of the spine. And it's really not meant to kill you instead to make you stronger, again, from the bottom up.
So we're gonna get started from the foot edge of the reformer. Before we do though, let's set your springs up Once we lay down, we're gonna go to 4 springs, 3 springs, if you'd rather take it a little bit slower. I'm I have mine sent to 2 reds of blue and a green. So warming up, we're gonna start with what I call foot awareness. I'm gonna bring my feet to hip width or just maybe slightly wider, and to a rotation that feels comfortable and natural for my body.
I'm gonna find my arms hanging down comfortably, not rounding my spine instead getting long from the crown of the head down to the floor and back again. And from here, I'm just going to lift all ten of my toes and lower all ten of my toes. We'll do this five times really being sure to lower them down at the same time because we're gonna get fancy in a moment. And now we'll lift the toes and hold. All ten toes are awake and alert and we're going to lower them one by one on each foot.
One foot might do this naturally. The other foot might look like it needs some help. So it's okay to look down and watch this trying to keep your ankles neutral. All of this will help your footwork exercise feel a little bit more comfortable when we lay down. After this, we're just gonna spread all the toes, like electricity is coursing through them, standing nice and tall, Bending the knees is if you're sliding your spine down the wall behind you, get to that point where you feel the stretch in your calves, but your heels stay heavy.
And then I'm straightening to come back up. 4 more like this. And in my mind, there's a heavy brick on my head, and I'm pressing that brick up to stand tall. And then I'm letting it weigh me down a little bit so I get back to that stretch in my lower limb. 2 more like this bending and stretching.
And now I'm going to bend and hold Stay here. Lift all ten toes again. Lower all ten toes one at a time. And stand tall. Take a now that we step back, we're going to hinge forward rest your forearms on the foot bar, finding the width of your legs and your toes again. And from this position round your spine, exhale scooping, round and hold.
In this scoop, take a look down at your toes, take a look down at your feet, and see if you're rolling out or in on your ankles. And if you are, find that place where you're balanced. Looking into your belly, Hold this position, pull your inner thighs together, stay here, and now start from the tailbone. Take your tailbone up to the ceiling, like we're going into camel, go through a flat back, go up through the crown of your head and your tail, Look up. Don't hesitate to take your eyeballs to the ceiling. And now we'll reverse this starting from the crown of the head nodding eyeballs are coming down. Your spine and your pelvis start to respond.
Round your spine separate your blades. Really feel like a cat on Halloween. Ryan George Spine here. One more. Start from the crown of the tailbone. Extending, extending, lengthening, long, looking up wide back here, And, again, gaze comes down, head comes down, spine goes round, look at your feet, Are they still flat on the floor or have your ankles gone somewhere else?
Find the balance in the feet. Return to neutral here. One more thing before we lay down, I'd like for you to wag your tail. We're going to one side and then to the other. And as you're wagging, see if you can just keep this isolated to the tail to begin.
So my tail is wagging. My head is not coming to the party yet, but now Let's let the ear come to the hip. I'm wagging sideways. My ear's reaching for my hip. I'm returning to the center.
And then I go the other way and try to breathe through this. So I'm not holding my breath because that's less fun. And fainting is no fun either. So inhale and exhale return to center. Last one. Big breath in.
Exhale, return to center. Now round the spine, pick it up. Check your weight on your toes. Walk up to stand tall. And now it's time to lay down.
I know you've been waiting for this. So we've already adjusted our springs. We'll sit down toward the forward edge of the carriage, hands come behind and lay down. Make sure you're not squished to the shoulder blocks. We'll find the heels on the foot bar, legs parallel and hip width.
If you need to go a little wider, that's fine, but let's try hip width for now. Arms will be down by your sides. From your under butt, press back until you stretch through your heels, and exhale pull in. We'll do 8 of these really thinking about what's straightening the leg. So I'm not thinking of pushing into my knees.
Instead, I'm thinking of there being a tether from my sits bones to my heels and I'm working through that to get my legs straight. 2 more here. And here's your last one pressing back and coming in. Now we'll slide down to the arches of your feet. And if your ankles are tight, you might wanna let your feet turn out just a little bit, just a little bit, We'll curl our toes like you're holding on for dear life, but they're not on the bar.
Same thing. Pressing back and in and never sacrificing the breath. So continue to breathe as if your life depends on it because it kinda does. Right? 4 more, and 3, and 2 will do one more here close the carriage. Let's get those electric toes again, spread them, pressing through the whole mid foot really feeling the mid foot ground to the bar. And, again, thinking of that tether being what's straining the leg, So we're putting tension on the tether, and then we're releasing it here. 6, 2 more, And here's your last closing the carriage, sliding down to the toes, And, folks, let's beware here.
The little toe, the elusive pinky toe, is going to connect to the foot bar as well. So make sure All pen toes have purpose here. As you press back, you may need to take a little adjustment to make sure you're fully connected And then again, closing the carriage without her thunking, feel the extension through the hamstrings, Feel the ankle staying stable. So you'll note that my heels aren't rising and falling. I'm keeping my heels stable as if they themselves are on the bar.
Requires a little bit more control. All the way in. Now we'll go. Same idea Pilates stance. The little toe is on the bar. I'm going out, and I'm coming in.
So I brought my heels together, but If your inner knees keep your heels from coming together when you're doing footwork, it's okay to keep a little space there. 3 more here and 2. Now we press back and stay hold. Maintaining the length in the knees, stretch the heels under, lift the heels up. 4 of these 3 of these.
And 2, last one slowly gently, creasing at the hip as you close the carriage. So let's do one more of those. I'm gonna press back here And as I'm closing the carriage, I'm keeping my pelvis neutral. I'm not tucking it with me as I close. Sliding away just a little bit because I got a little squishy there, and I'll bring my heel my arches to the outer corners of the foot bar.
Keeping the carriage against the bumpers and closed here, I'm going to start from my pelvis, scoop, and roll up into just a half of a bridge. And then I'm rolling back down. 2 more like this articulating, and you'll notice that I'm not pushing my back into the carriage to lift up. Instead, I'm thinking of my sits bones curling up toward the ceiling and that's what's lifting me off of the mat. This time will go neutral bridge, so I'm just lifting my hips off, Again, I'm not coming all the way up. I'm working on can I keep my spine neutral from tail to my bra line or my middle back? One more.
Wasn't that fun. Now we're going to add on. So this is a 4 step process. We're going to roll the hips up or press the hips up for 3 counts. 1, 2, free. From the under button, the inner thighs, I'm gonna press out to 3.
I'm going to sit down 2, 3, and close. Why do I do it this way? You may ask because it requires me to be very stine about my movement. If I go quickly, I can crash and make a big mess and tell myself I'm doing something, but I'll be lying. So instead, I'm really working to get through the bottom and the top of each action. I'm pressing back long. I'm sitting down, making sure my spine is an arched or tucked.
And I'll do one more. I'm lifting. I'm pressing. I'm lowering and I'm closing. Next step, it's time to take a change here.
So arms are going to come up. Legs are slightly turned out, and I'm reaching for the ceiling as I hover and then nod my head up. I'm curling up into my roll up. I'm sitting nice and tall, and I wanna do it again. So I'm going to scoop my belly from my pelvis.
I'm rolling back. Two more like this, hover, nod, exhale, and curl up, reach for your toes, reach up, scoop rollback. We have one more to do. Hover, nod, curl, scoop, and reach. Hold here. If you can keep your legs here, to it. You'll reach down.
I'm going to go to 2 red springs for me. If you're on a balanced body performer, it's 2 red If you're on something else, do the spring load that works for you. We're doing arms next. So I'm rolling back down with Grace and dignity or one or the other. And I'm grabbing my loops.
My hands are going in. I'm grabbing hold, and I like to make fist because I want to get my elbow straight and feel the connection from my hands into my armpits, bringing both legs up, This is a simple arm series. Think about letting your legs be where they need to be. So if you need to let your heels drop, that's fine. Table top is great too. From your armpits, pull down, and up. Never letting the carriage crash never losing tension in your ropes. 2 more like this.
And one. Adding on triceps will happen next. I'm coming down. My arms aren't all the way down flat. I'm hovering, and I'm curling. And as I'm pressing away, I'm really feeling my triceps engage as I'm bending its bodies.
Two more. And now we'll go into t Press Open your arms out to the side and pro tip. You wanna be able to see your thumb is in your peripheral vision, and then I'm pulling back in keeping my arms level, trying not to let them creep down or up. 2 more. Here's your last one.
Now your armpits are closed. You're going to bend your elbows without letting the elbows dropped to the mat. I call this bat wings or chicken wings or whatever flying bird like product, I'm thinking of at the time, one more, and now we'll go into feet and straps. So There's a couple of mounts to do. I'm going to show you the slightly more complicated one because it gives you something to work into.
If it works for your body. So what I'll do without moving the carriage, I'm going to bring one foot into my loop. Still not moving the carriage, I'll bring my other foot into the loop. And from here, I'll bring my tailbone down and my feet come with me. I like to set up in this chair position first, and then I'll extend my legs up.
In this up position, my tail is heavy to the mat. My back is long, so I'm not pushing down no air under my cheeks. From here, I'm in Pilates, Stanson. I'll do lower and lift. As I inhale to lower and exhale to lift, I'm thinking about my energy going away and opening the front of my hips.
And as I'm coming back up, I'm creasing at the hip. So let's do 4 more like this. There's no tension in my toes because it's not a toe exercise. I'm working my back body. I'm working my abdominals, and I'm having a fine time here to do that one. And from here, we're going to frog the legs in.
Holding the carriage still. I'm bent at my knees and my hips, but I'm not affecting my low back, pressing long, zipping my inner thighs and my sits bones together, as I lengthen, think of castanets, they're closing, and they're opening And last one here, holding this position in the knees. The knees stay fixed. I'll open my hips to go into half moon 4 more. And, again, this is a hip action, not a knee action, not an eyebrow action.
It's very isolated. 1 more. And now I'll go into swimming frog. So I press long hold. I open wide, keeping the carats still.
I bend the knees to bring the heels together and again. Open, flex the knees, squeeze, 3. Never forget those nourishing breaths. And here's my last one in this direction. Reversing, opening wide, zipping together, frogging in. And again, pay attention to where you're expanding the energy.
If you feel that your shoulders are particularly tight, what can you do to release that so that you can focus your attention on where it needs to be. Last one? Zip it together. Bring your legs up to 90 and hold at the inner thighs and lightly engage the under butt, we're just gonna lift the hips and lower. And in this public lift, the idea is that we're keeping the carriages still as possible.
We're keeping the energy going up in a way, not in toward us, and that allows us to stand into our rope. One more. Exhale. Low belly. No pressure into the carriage. Oh, I cheated on that one. I have to do one more for good measure.
And then I'll come back into my frog position. And to release, the idea is that we can let both feet out keeping the card still and slide in. Your loops go back on your shoulder blocks. Or on your pegs, whichever you have, you'll grab hold behind both legs and nod your chin to your chest. The gaze is actually on the footbar, press your inner heels together, and we'll just rock.
So looks easy. Right? It is not easy to keep the cared still as we rock. So this is a nice transition that you can keep your back a little flatter too if you need to. When you get to the top, rest your legs over the footbar, and then swing off. So for our next trick, We're going to do kneeling arms. What I'd like for you to do here, because it's arm work and it's very precise, select our spring weight to be a little bit more on the lighter side, you can add weight later, but start off lighter so you can really keep a close eye on your form.
I'm going to 1 red spring on a balanced body reformer. From here, I'll kneel on my carriage and bring my knees all the way up against the shoulder blocks, My hands are going to wrap around, and I'm extending my fingers because my fingertips and my thumb tips are working to help me here. I'm rotating my armpit forward. My elbow pit is pointing straight ahead, and my back is nice and flat. Hips over the knees. That's important.
Gonna go a little farther forward. Now from here, The idea is that my armpits are pulling me forward, and that works into my triceps And it does not work into my chest or my face or my eyebrows. So as I'm pulling, I'm working to keep my elbows long, keeping my back flat and keeping my knees over my hips. 5 of those I think is more than enough. From here, we're going to lift one arm and take the opposite leg back.
Just hold it for a lift and lower five 4, 3, and 2, and 1. Drag the leg in round your spine. So the gaze will go to the pubic bone, and the pubic bone will go to the nose. Same idea, but this time, we're going to do kneeling legs. The knees are going to pull me forward but notice my cheeks, my hips are staying lifted. 3 and 2 And this is a real abblaster.
1, and then I'm going to go to the other side. Find your flat back. Lead goes back. Other arm comes up. Now quickly, look at your standing leg.
No leaning outer in. Try to stay very, very square and your back leg will lift 5. 4, and 32, and 1. Bring the leg in, sit back on your heels and lift your chest. Just take a stretch here, opening your upper back, nod your chin your chest, scoop and start to round up.
Now we're gonna lay on our side You can keep the spring load the same. It and your mind is going to tell you that it feels light, and it might but here, you can really focus on the form. So let's keep the lighter spring. We're going to bring the inside edge of the standing foot to the foot bar. Feel as if your heel is engaged to your hip bone, sit bone, and then your front arm is gonna come and hold on.
Keeping your shoulder away from your neck, press out and pull in, and really give your ankle and your foot, the opportunity to stretch here, even though it might wanna lift or curl or do something untoward, Watch the outside of my foot stay parallel. I'm not bending my ankle that way because it hurts. Don't do that. Let's just do one more here hold. Extend your bottom leg. You'll push this hand into the shoulder block to feel lifted on the bottom side.
Bottom leg will lift 5. And for 32. Here's your last one. Lift it up. And come in, close the carriage. We'll go to the other side from here.
Try not a bang instead keep your body light and lifted as you go up and over. Your standing foot, again, Heel in line ish with the sits bone inner blade of the foot is on the foot bar, and you're pressing through that inner blade of the foot find level with your hips for more like this. And remember, my top arm is pressing into that shoulder block. Helping me keep my spine angle neutral. And now I'll press out and hold standing into the foot, extending the bottom leg long, up and down 54and32 one coming all the way in.
I love that one. I must say with grace and dignity, we're going to come up and we're going to stand. So for this one, you'll need to change your springs again. I would add another red spring. So for me, that's 2 red springs.
To mount my reformer, I'm gonna come two hands on Step my inside leg on first, then my outside leg. For front splits, I'm going to bring my back foot tented to the shoulder block. My front foot's gonna come to the platform, and it's the ball of my foot that's on. I'm letting my heel descend just lightly. The name of the game today is Square hips.
So both of my hipbones are pointing at the wall in front of me. I'm pressing back. And I'm coming in. If I let my hips rotate, I can go down farther. But again, the goal is to stay square so my body gets really acclimated to that square position as my legs are stretching in opposition. 2 more.
Think about your elbows here too, even though we're working from the bottom up, our upper body is participating as well. Now I'm pressing out and holding. My back knee is coming under me, and then it's pressing away. So, guys, really important here your under butt, your six bones are drawn together. They're very active.
If not, you may have too much weight going into your back knee, and it might not feel comfortable. So keep all of this turned on. Press back a little bit more and then come all the way in. Once the carriage hits the bumpers, we can switch legs, stepping back first, shifting the weight to your hands to bring the forward leg onto the platform, feel all five toes being active in the front, And, again, staying square pushing out and pulling in. So in profile, if I'm staying square, You will hopefully only see one butt cheek, but if I'm turning out, you'll see both. 2 more.
Both legs working to take me back. Let's do one more. Press and zip my inner thighs together to close the carriage Now I'll press and hold. Back leg only. I'm pulling in from my back front of my thigh as my back of The thigh presses me away.
One more stretch, press back a little extra, and now pull all the way in closing the carriage to the bumpers, stepping off to the side. You can sit down. We're gonna go to 3 red springs, and we're gonna close this out here. So lay down on your back. And, again, give yourself enough breath between your shoulders and the blocks to be comfortable.
We're gonna bring our feet onto the foot bar anywhere from all the way together to a fist with the part and let the mid foot be on the bar. We're going into our pelvic lift here, pressing the pelvis up, holding at the top, and we're just gonna march. And why are we doing this at the end of the workout you may ask? We're just checking in. We're finding where our strength is, where we may need a little bit more attention once we stand, and we'll do one more here.
And now sitting down creasing at your hips until your tailbone hits the mat, Slide the toes on to the bar, find the little toes, press out and hold, stretch the heels down for a calf stretch, and now we'll run. Then one knee and then switch. And in my running, I'm working to keep all ten toes connected to the bar so that I can feel that constant flow of energy back and forth. As I'm letting my calf stretch down, my other toes are pressing into the bar lightly and doming my foot. And 2 more, And one more, and I'm lowering all of my heels under slowly dragging myself in, and a roll up to sit up will stay parallel this time.
Keep that space between our legs. Hover, nod, and curl all the way up. Try to step off without holding on to the bar because why not? And we're gonna come to the back edge again. So I like to revisit where we started, finding your slightly turnout position, we're gonna come down to the bar.
Palms are pressing up back is flat. And now just curling from the tailbone and then going the other way. Curl and extend. And you may notice a little bit less tension in your feet, a little bit less tension in your ankles and toes and now hold it neutral wagging side to side. Hopefully getting a little bit more stretch in that side flexion, adding the head. And now we'll come back to the center.
Scoop the body start to roll up. Finding your balance here. Think about lifting up through the crown of the head, All ten toes are active. As you lower the heels down, lower them with grace and control, no plopping allowed. It's not even a pretty word, really.
Is it? And let's do one more. Lift and lower and release. Thanks for joining me for this workout today.
Beginner Reformer: 30-Minute Classes


Mention
 |
Misty Lynne Cauthen (Teacher) |
 |
Nzingah |
|
|
Vicki A |
|
|
Claire W |
|
|
Courtney C |
|
|
Danielle |
|
|
Stacy H |
|
|
Peggy B |
 |
Kao L |
|
|
Vanessa R |
 |
Amanda T |
|
|
Mary K |
 |
Zola W |
|
|
Monica B |
|
|
Crystal |
|
|
Tanya P |
 |
Katherine R |
|
|
Rochelle |
|
|
Sara E |
 |
Lacey |
 |
Megan W |
 |
Connie M |
Comments


You need to be a subscriber to post a comment.
Please Log In or Create an Account to start your free trial.
