Description
About This Video
Transcript
Read Full Transcript
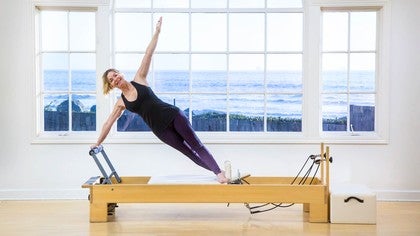
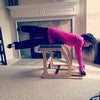
Hi everyone, I'm here for reformer workout. And today, I feel like doing side support, the one arm balance side support. So, I'm gonna build it, I'm gonna do what I wanna do and give you an opportunity to get to side support with me. We won't do a full workout in the list but elements that you'll need to be successful in your side support, okay? Today I'm using a foam roller.
Pilates Stance
I've got the squishy one. I like the squishy one, it's a little easier to be on than the white, or the black, or the blue, but if you have one of those that's fine. Let's put it up on the reformer, we're going to be doing footwork on this first. So head rest down and place the roller right here at the very end. I'm on a red and a blue so we're not doing a lot of weight.Now I'm going to explain why I'm doing this. I using the roller to immediately put my center body in a little bit more of a shock system, meaning has to stabilize to get me ready quicker than just lying supine. And when we get in that side support, that side balance, we know how critical it is to have all of this collected and organized and ready for us to be successful. So, that's what I've chosen this for. Here we go, and oh, also let's do a low bar.
I'm gonna switch that there. Okay, everybody, so climb aboard. Go ahead and get down on that roller. Guide yourself down and whew, right away. Also, the squishy rollers are harder to balance on therefore you gotta use a little bit more commitment and control and connection in there.
So, let's step up. I'm gonna place my feet on the foot bar. Let's go to Pilates V, heels together, slightly lifted. Take a quick inventory on that sacrum and pelvis that you're not in a posterior land, okay? So we'll start nice and level but let's breathe first.
So getting ourself collected and right away, feeling the very fun challenge of balancing on the roller. You gotta pull right into that center seam, right in there. So every exhale, let's think about the sides of our waistline narrowing in to our center line. It's gonna be really critical also in that side support, accessing this side body connection into the midline. Okay, twice more breathing in. (breathes) More exhale, a little more exhale.
Once again. (breathes) That should have just cooked up your abs, right? Okay, alright guys here we go. Inhale and stretch it out, so we're on a red and blue. Why do we have it so light? Well, too heavy you will not be able to stay on the roller.
It also has a little bit of relativeness to your body weight and things, so I could have done a red or a red and blue. And if you're curious about what it feels differently, then go ahead and sit up and check it out. I'd go lighter if you're gonna check it out, not heavier. Alright, so as we're doing these leg presses foot work. I wanna be connected to the roller, I don't want to smash myself on it.
I have an image right now in my own mind that I'm kind of gliding over the top of the roller. Now clearly, that's not happening but that's just an energetic or a quality of movement I'm working with so that I'm not pushing myself on it. My abdominals and my back are co-contracted to help me stay balanced. Now, pause for a moment. I am going to make a choice to rotate my arms the other way.
Palms face up, elbows, veins face up. I felt like I was just really going into too much pec and shoulder like that. So come on along, let's pick it back up with Pilates V about three more reps. Yeah, much better, happy shoulders. We need good shoulder positioning for that side support.
Okay, let's move on to burn on a perch. So step your legs to parallel. Now, before we continue doing our leg presses here. Two things, pick up your head just super quick and make sure that your feet are right in the center of the foot bar, right? So, you're still in your center line.
Arches
The other thing, throughout this footwork, I probably could have said it at the beginning, try not to turn your head to look at me because you could lose your balance a little bit up here, okay? So just listen to what I'm saying, I'm trying to be as clear as possible. I do my best there, and stay looking straight up to the ceiling, alright? So alignment of your head and your neck. Here we go guys, we're on a prehensile, we're moving out.Inhale, stretch your legs. Exhale, bend. 10 reps, inhale. And exhale. You may notice a little bit of rocking on top of that roller is normal, but see if we can steady ourselves.
Keep adjusting those shoulders, less up near the shoulder blocks, more down towards your back. Inhale and exhale. Exhale, getting a little bit more indentation from either side of your spine and abdominal muscles. One more time, inhale, stretch. And okay, you can pick up your head just lightly step your heels.
Heels
We're still ankle to ankle, knee to knee. Make sure you're centered, here we go, 10 repetitions. Then stretch and bend. Whew. Stretch, bend.Now every exhale, remember, know your waist. (breathes) Seven, and in. And eight, and in. The calf stretch that's coming feels quite nice, coming up on the roller. Last one, right there.
Okay, same thing, pick up your head just a bit. Look and see that your feet go to the balls of the feet. Now, lets go with a little bit of space between, more like you'd set up for a pelvic curl, okay? Heels start a little bit on the up side, extend your legs, stand right there and let's enjoy a calf stretch. Very slowly, this might be more intense than your normal calf stretch due to the physics difference here.
Calf Stretch
And then rise, we'll do 10 of those. Lower, and lift. And lower. Lift. And lower, (breathes) five more.(breathes) Whew, good, pull in your heels low, raising them high. Pulling them high, raising them high. And one more time, we will not walk in place, you can do that later if you like to. Bend both of your knees and come all the way in. Okay, extend your legs over the foot bar.
So, legs are together. Pick up your head, make sure you indeed are still in your center. If you're not, oh well, make the adjustment. And then, come back down, okay? Now, I won't have us do the 100 with hands and straps that would not be smart, but we can certainly do a head lift or spinal flexion and we can reach our hands towards that end of the reformer.
Hundred
And we can get ourself in the muscle connection of the hundred, right? We can. And let's lower back. And I think I have a couple more in me there. Ready?Go, exhale, head lift. Roll the head forward, reach, reach, reach. Now, why not? Do you wanna try? Who wants to try lifting their arms?
Concentrate. Okay, whew. Lower down. One more, let's see what happens this time. We might wanna start pumping.
(breathes) Side support also demands quite a bit of concentration, they all do. Connection, here we go, let's try. Gentle pumps, right? (breathes) Yes, I'm using the foot bar. My legs are resting on it kind of.
(breathes) That's for safety. (breathes) Halfway there. But act as if you could pick up your legs. Feel as if you could pick up your legs. (breathes) Two more.
(breathes) Last, whew! Three, four, hold. Go a little higher and take it down. Oh my goodness, okay. Come on off the roller everybody. So just plop yourself down.
Reverse Knee Stretch
We don't need it really for anything else today. So, let's just tuck this down. Pretty good, huh? Just kind of getting right into that middle body. Okay, so I'm gonna work on some arm preparation, some upper body preparation for that weight bearing.So, with this one this reformer has a yellow spring option. I'm going on yellow, now if you Gratz. Yeah, you're gonna maybe wanna do this on the floor because I think a red or a one spring on Gratz is way too heavy. I'm going really light for a reason. I don't want to strain the shoulder girdle, I wanna enough tension to pull with but not so much that I can't move, okay?
So, you're on your knees, you're walking yourself, your hands on the frame. And I've got my thumb on top, very important, try not to put your thumb on the inside okay? And think about this, when we go to do side support how our hand is wrapping around the foot bar. Okay, use this even though this narrower. Kind of use that connection here, plug up into your shoulders, and we're in a nice extended spine.
We're not in flexion, we're in extension, okay. Look ahead, where I'm gonna have us walk, one hand, one hand at a time toward that end of the carriage. So one hand, pull yourself. One hand, pull yourself. Take little bitty steps.
Ugh, not easy. Go back with control, little bitty steps. Your spine is going to be moving a little side to side, that's okay. Do it again, so hand and then pull from your mid trapezius, your lats. Other side, it's really weird to do slow so I'm going kind of quick, uh huh.
Walk back, keep making sure you're collecting your tummy in and up. Twice more, start with your other hand first. Try to keep the feet down. Try not to pull your hip flexors. This is upper body shock value (chuckles), okay?
One more time. And one. And back. Okay, am I there yet? No, there.
Whew, weird but good. Just try it. So, as I put on another spring I'm going to also add the blue on this reformer, so I've got blue and yellow. I want you to come up on your knees. We're gonna keep connecting up into the upper body.
Kneeling Lateral Arm Extension
And the back of the arms for some strength and some support. So, I just stuck my hand through the loop, that's how I like it. And then I'm gonna hold onto the black wrapping. Okay, now. It's not chest expansion, I want you to think about pulling the ropes apart from the midline and then bring your arms to the side line of you.A lot of shoulder work here, rear shoulder, lat, upper back. And then, return. I'm thinking six reps, we don't need many. Exhale. And inhale.
Nice lift in the spine. Your eye line, your gaze, is straight forward. (breathes) And in, we've got three more. Upper back, sides of shoulders, two more. (breathes) Last one, hamstrings working too to help keep the hips open.
And now, little change. Slide your hand into the cotton loop, okay? Same orientation, take your arms up, palms are facing back, and I want you to press again. It should be a little harder to pull. Think wide straps, wide shoulder blades, and then start to do little circular movements of your arms.
Kneeling Lateral Arm Circles
(breathes) One more for six. Reverse six repetition, try to keep pulling your arms back a little bit from between your scapula. Three, rear shoulders between your scapula. And five, and six. And release.Cool, huh? Okay, take one strap down. Let's go into a little bit of kneeling side arm, the draw sword. I'm just gonna take the yellow off. So now, only blue.
Kneeling Side Arms
Some of you are on a red spring, that's great. Go for that if you'd like. I'm fine with just the blue. I like to make fist. Put that fist right in front of your navel.In front of your body, not right up against, but a little bit out and just hold for a moment. Okay, feel how that shoulder is low, your ribs aren't shifting, your core is stable and strong. Your torso's kind of like a big tall pillar, right? Now we move from the arm, here we go. (breathes) So I like to think I'm moving from my elbow kind of first.
Elbow, forearm, wrist, and my thumb sticks up. We're gonna do five or six. (breathes) Strong, you're need that for that side support, let's go one more. (breathes) And just that on the other side. That's a lot.
Okay, so setting yourself up again. Fist in front of navel, opposite arm by your side. For just a moment feel how your torso's a strong pillar. It can't shift side to side. Your abdominals are solid.
Your back is supported. We're ready to move the arm, here we go. Elbow, forearm, wrist, thumb. Control your way back in. And exhale.
(breathes) And inhale. Collar bone stays level. Shoulders stay level. (breathes) Five. One more here, everyone.
(breathes) And in. Okay, put that strap down, pick up that headrest. Turn and add another spring. So, I'd like us to have one blue spring, one red spring. If you're on your Gratz, two springs.
Long Stretch
And on Peak, a medium and white. I don't remember the combination on that one. And we'll pick up our foot bar, we're gonna put it up in middle setting, okay? And now you stretch, of course long stretch because you're gonna need your arm balance. Feel like you've got some blood in your arms now.So, place one foot against the shoulder rest. This is a little different than how I usually do it. I often do it on the head rest but today I want it here, I want my feet against there. They'll be near there for the side support exercise, just in a different setting. Okay, hand hand, foot foot, and stand on your arms.
Lift your tummy, tidy up your legs, hold yourself there. And now push. And pull. My legs are just about as active as my upper body, my arms. Put your body connection back in being on the roller doing foot work.
Really pull into your center line. Two more to go, press. Pull. Your legs need to be tidy and strong. And then bend your knees down.
The reason why because they're gonna need to be tight and strong on your side balancing, right? Yeah, shake those out. That's all for that one. And I want you to take your foot bar down out of your way, leave just the red spring on, and in side support we need strong and connected hips. So, we're gonna do a little bit of side hip, excuse me.
Clams
Head rest down, put yourself down through it and let's get into a little clam setup, okay? Could have been a bit more graceful but, oh well, that's the way it goes. So here we are, knees together, hips on hips, ankles together. I like this hand by the shoulder block, it keeps me kind of from getting sucked into it. And lets press the femur up, okay?And up. Let's go for 10 of these, they feel good, too. Three. Okay, we're just moving a little bit, guys. Well, in science support though we're not doing external rotation, we're in parallel.
But I wanted to do turnout here, first. Then we'll do parallel in just a moment. Eight, and you've got your little here, right? And nine, of course you do. And your ten.
Okay, now let's not move the carriage. Flex the feet and just hover and lower. No movement of carriage. And I had to slow my tempo down to get that. So, I want you to keep the contact of the strap on the back of your thigh strong.
Side Leg Lifts
But if you start to push too much into it you're gonna actually kick the leg, so none of that. You're just lifting and lowering. And here's five more. Whoops, a little movement. Four, and you're not in a tucked pelvis, three.Got a good sense of what's going on here, four. Last one, now stay up. Now, back to external rotation, soften your feet. Let's make some circular movements with our thigh. Five each way, three.
Side Leg Circles w/External Rotation
Four. And five. Other way, side support requires connection and activation in from your hips to help lift your body weight, so it's not just about your arm and shoulder. We resource those hips too, okay? I believe that was give so we'll come on down.But that's all, let's just come on up. Take that strap off that knee. I'm getting excited so I'm moving a little bit faster through here. Alright, lying down, arm goes through. And your foot through the strap, it's right above the knee.
Get yourself set up, hip on hip, knee on knee, heels and sitting bones are a little spaced for that mouse right there and behind head. And clam, 10 of these, too. And three. Four. Five.
Six. Seven. And eight. And nine. Last one, ten.
Okay, then it's parallel time, right? Flex the feet, try to hover the leg without moving the carriage. It could move ever so slightly. I'm also trying not to roll back and lean back on that shoulder block. And up.
Connecting to the side of your pelvis. (breathes) Shoulders easy, down from the shoulder blocks. Last two coming, nine, ten. This is it, ten, stay there. Externally rotate the femur, gonna relax your feet.
Put the focus in your hip joints and stir that thigh around five each way. (breathes) Three. And four. And five. Reverse it five times and press back.
And press back. Three. Four. And five. And that's all, knee to knee, come on out of there.
Use your hand to help you up, okay. So, I wanna have us go back to one more weight bearing exercise, okay? Bring that high bar back up, or on this reformer it's the middle bar. Red, blue spring again. Same place with the foot and the hand, and the foot and the hand.
Plank w/Inverted V
Now, climb up into that inverted V. Sometimes you hear us call that an inverted V. Firm with fingers. Look toward the headrest or the space between your toes and I want you to take a moment and reach your hips up high. Stretch those hamstrings, lift your hips up high, okay?So, grab it, some strength into your external rotators of your shoulder. Let's from here, press out to plank, okay? The other one was kind of easy, wasn't it? This one is upping the level a little bit, press out. So as my chest rises, as my hips lower, and the plank is way extended.
Fold back in. Let's do a breath cycle to reach that plank. (breathes) Strong legs beneath your hips and in. Okay, three more. (breathes) Two more.
Last one, where we'll stay just for a moment. Just for a moment. Equal weight on all four parts and come back in. Okay, everybody, let's build it up a little bit. We're getting close to the plank.
Short Box Oblique w/T Position Arms
We're getting close to side support. I want you to take your foot bar out of your way. Make sure your safety strap is ready, or your ankle strap, excuse me for your ankle. Grab a few more springs on there for stability. Box up on the reformer.Short box, obliques, of course. Okay. Now. Wanna have us to find our arm position before we lean over the edge. So here, as I'm starting with one foot up on the box.
The other one is over there on the platform and my knee is bent. Design your arms in, excuse me, your T position, okay? And instead of starting with your ribs leaning to the side with your arms in T. See if you can get yourself to get into this pillar, your torso's a pillar, and then there are your arms. Okay, strong.
Keep this design, and let's lean over the edge. That ankle strap is going to be there for you, do not worry. Flex your foot though. Lean out, whew. Yep, and just hold.
Isometrics are really, really important. Just hold. I want you to visualize your lumbar spine getting longer and you're getting more length out of the cervical spine. Okay, so from here, exhale yourself up just a little. Keep tension in the strap.
I'm more interested in the shape of the arms, connection here. (breathes) Let's go for five of them. (breathes) I moved a little. (breathes) One more. (breathes) Hold.
And release. Other side. We're just about there, guys. Okay, so same thing. Organize your center, your torso pillar.
Side Support
Take your arms and stretch them. Lean over the edge, to find that strong position. Taper the waist in and then think about the lumbar spine getting longer and these muscles longer through your back. Alright, we're ready to go. down a little bit on the inhale. Exhale, come up just a little bit, feel strong.Inhale, so not really bending the spine, I'm leaning. Somewhat of a reach. Last two, inhale. Last time, (breathes) and coming up. Okay, shall we try it?
I think we're ready. We did some abs, we've got our arms warmed up. Our hips ready, we did some weight bearing. We went sideways, so here we go. I would like for us to do a red and a blue.
If you're on Gratz, you could do one. But whew, that carriage could move really quickly. Two, you might now get a lot of movement here, but that might be better, we'll see, okay. Hand in the middle of the bar. Not back here, right in the middle or even a little bit more in front of your shoulder, okay?
Thumb with fingers, please. Inside foot, that's gonna be the right foot. Now before you rush through this let's indulge ourselves in getting our hips connected. So, you're on your arm, you're on the side of that foot. This hip shouldn't be drooping.
I want you to pick up your hips and feel how that's already an exercise. Start to climb on. I gotta wiggle my foot, it's too close to the reformer. Climb on, and step flat footed and regain your T position, okay? You could stay here if you wanna move a little bit.
Use your feet against the pads, that's okay. Push down with this arm, feel that T. There's your side overs and exhale, pull right back in. And your legs are strong for you. Inhale (breathes), exhale.
I was thinking five of them. I like to really have my feet feel evenly weighted. And four. And our shoulders are externally rotated, healthier. And there's your five.
So, to get out of it, put the knee down, walk forward. And just pivot right around, okay? Here we go, side two. Hand on the bar, thumb and fingers. Inside foot, the same foot as hand.
And you're on the side of that foot, the ankle in a minute is gonna have to come up. Lean onto your arm, if you're already up fantastic, I'm just gonna give myself a moment more of lifting my hips. There, that was what all that clam stuff was for. Now I'm ready to climb aboard, step down, you're in your T position. Your legs are strong and you lean the carriage out.
(breathes) You pull it in. And you press (breathes) and you pull. And the feet are evenly weighted, their connection is important. (breathes) Last time, everybody. How did you do?
I can't see you, of course, I know you're doing great. Okay, set your knee down, step forward. How'd you do? Really good. Okay, I don't even think I need to stretch.
If you want to stretch you can and finish for the segment now. I hope you see how my approach to threading something happened and let me know how it felt for you. See ya' later, bye.
Pilates with Amy Havens: Intermediate Reformer Workouts
Comments
You need to be a subscriber to post a comment.
Please Log In or Create an Account to start your free trial.
