Description
About This Video
Transcript
Read Full Transcript
Hi. I'm Misty Lynn. And today, we're going to do the fortified mat. So this is a mat express class quick and dirty exploration of our standard principles that we know in movement with a focus on balance. So I've got Kimberly here, and Aaron, and we are gonna have a great time as soon as they step back and we start the movement here. So let's everyone come to Pilates stance, let the arms come down, and I want you to find yourself balanced over your middle foot.
So let's lift all of your toes and feel that space where your weight is balanced over the ball of the foot and over the center of the heel and lower the toes. Again, lift, and lower. And one more lift. As you're lifting and lowering, try to keep the whole form quiet. Lift and hold. Take a small knee, Ben. Keeping the toes up. Yep. And straightening up, relaxing the toes down.
2 more. And, again, just centering Nothing to worry about until now. Just kidding. One more. Bend and straighten and hold. We'll bring our arms out and up. Nod the chin to the chest and cascade up and over to roll down. And check where the weight is.
Can you lift your toes and not go flat? Lower the toes scoop and roll up, think of the pubic bone drawing in towards your nose let your upper body hang, and you're not done till the crown of the head is up, arms circle again, wide, up, cascading up and over, round spine, more weight over the balls of your feet. You too. I can see you from here. More forward, more forward. Feel like you're gonna put your toes down.
I mean, your fingertips down and scooping and rolling back up. Holding here at the top. Feel that place where you can hug your inner heels together. Without displacing your rib cage, bring your arms down by your sides, and we're just gonna lift up to the kitten heel height. So zipping everything together along the midnight midline to find the kitten heal height and then lower inner heels press together to more And if your inner heels don't touch because of the contour of your leg, it's okay to give yourself a little bit of space. Lower back down.
Standing 100 is next. So we're going to 1st find that balance point. Let the gays lead the head into your abdominal curl and hold this position. Your zipped up along your midline. Your arms are down by your sides.
Find your armpits and pump. Inhale. Now exhale. And as you're pumping, Think of the zipper coming up from the inner heel through the inner knee up into the pubic bone and then up to your breastbone. Inhale. And this is not easy business.
So think of where you're holding tension where you don't need it. And exhale. 3 more sets and blow. Find the weight in your big toe that helps to connect the inner thighs in the midline. Let's do one more. Inhale.
Lower the heels to stand up tall, to bring the arms up and around. Not at the chin of the chest and here we go again, up and over. Find the floor. You get two steps to walk your hands out into a plank. And then walk back in.
This time will roll all the way up will turn the feet parallel. Same idea from the top. Arms better fly up and around. You'll roll over. Find that balance, walk back out into your plank.
And now this time, you're gonna walk your legs to come in. And roll up, relax your shoulders, stand tall. You've got a book on top of your head. Feel yourself reaching that book to the ceiling arms come up. Nah. The chin of the chest rounding up and over. Up and over. Find that round shape here and stay.
Plant the hands. Bend the knees. Slide your right leg back into a lunge pressing through your toes to push it back. Now feel your abdominals deepen as you exhale round your spine to pull the leg back in. And other leg, try to slide it along the mat, bent knees, and exhale come into bent.
One more. Each side slide very nice and exhale stretch. It's hard to slide on sticky mats, but I have faith in you sliding out. And, Akcea, let the core pull you in round spine. Good. And now you're going to step your feet back. One step Maybe not quite so big of a step, but that's okay.
Let's hover the knees down. Toward the floor until you can get them right underneath your hips, hands are underneath your shoulders, and we're just gonna hold this. Let me think. I can tell you as story about man, maybe not. Maybe now is not the appropriate time for story time, but as you're holding this quad hover, check-in with your armpits, rotate the back of your armpit forward, fit your abdominals drawing in, and don't let your cheeks go limp. Keep energy in your under butt here, holding 3 more counts, and 2, and 1 slowly lower the knees, sit back into your child's pose, Make fist and turn your knuckles toward the floor, stretching the front of your wrists, So we're going to go forward this way.
Yep. And stretching, and you can just take a small rock here into the wrists if you like. And if you absolutely hate this, just hold the child's pose. And just one more stretch here, pull those knuckles a little closer, And then we're gonna come back up to quadruped again. Alright, guys. Now I know we might our friendships might end for the moment, but I'll keep it brief.
Cro your toes under. Go into your quadrupet hover. Let's lift your right arm and put it down. I would say just bend it in. It'll be more comfortable and then the left arm. And down. And then the right leg and down.
And then your left leg and down, and both knees will come down. And you saw some variations there. Whatever keeps you alive through the exercise works for me. Quad hover. Let's do it again. Lifter right hand.
Lifter left leg and put it down. So I said right hand and left leg at the same time, It's a little harder than it sounds. Yes. So, again, we make adjustments. Keep going. We make adjustments to make this happen, but this tells us where our center is. The higher the leg goes, the more distill it gets away from the body, the harder the work is. Let's lower down.
And lay on your bellies, please. For mini swan, I'd like for you to extend your arms like the letter y. So they'll be off the edge of your mat. And the outer side of the hand, the pinky side of the hand will be on the floor. Forehead down, legs will stay down the whole time, and you're starting from your eyeballs look up to lift the head, to lift the chest, You're gonna lift as high as you can without moving the arms, but eventually, the arms will move.
So start to lift, keep the elbows straight, and bring the arms back a little bit more. And then come back down lengthening down, stretching forward. We'll do that again. Gay's start Let the gaze go up the wall in front of you or up the human in front of you in this case. Keep lifting. Keep lifting, and the arms start to slide in and up.
And come back down. Now if you feel like your feet are really wanting to pull up, imagine that I'm at the edge of your mat and I'm pulling your legs away from your hips. Let's try that again. Lift and lengthen and then lower back down. We'll do one more here.
Keeping it simple, lifting up, find the width of your chest here. So resist the urge to contract in your chest. Yes. And then we're lowering back down. Slowly gently, and you're not done until your forehead hits the mat. Really work to feel that length in the low back and through the center of the back as well.
Very nice, guys. Now we're gonna bend the knees. Flex your ankles and pin your inner heels together, opening the knees a little wider than hip width. I'd like for you to bring your foreheads to your hands. Here we're going to do alternating prone hip extension. So one leg is gonna go up, just one leg, and then bring it down, attach the heels.
And the other leg lifts and zips. Start down here. Yeah. There we go. And lower. Other leg and lift. Ideally, the pelvis is gonna stay neutral. So we're not letting our tails go up to the ceiling like duck butt, to lift the leg.
We're differentiating between the leg and the pelvis now. Hold it. Legs are down. We're going to lift the head and the arms into the float position. Knees are bent. Hands come with you.
Hold. Flex the ankles. Now both legs are gonna lift at the same time. Again, not from your low back, but from your hip joint, the leg is gonna come up and go back down. Benion needs a little more for me, Aaron. And now lift up. Yes, ma'am. And back down.
3 more. Keep breathing. Lift. Find me with your left leg. That's it. And lower? 2 more. Keep the torso up and lower. Keep the torso up.
Legs down. One more. Yep. Lift here and legs down, and everyone comes all the way down. Extend your legs back. Take a quick child pose release the low back.
This time in your child's pose, I'd like for you to wag your tail side to side. Let your low back release. If you wanna take that wag in your upper body, wave it like you just don't care, that's okay too. How are you guys feeling? Okay? Ready to keep going?
I'm having a fine time. I hope you were too on your backs for bridge. In our bridge, this bridge is going to be a neutral bridge So I want you to think of your spine lifting up in one piece as we go up. And rather than pinning the arms into your sides tightly, I know that's what they tell us to do in Pilates land, but I'd like for you to open your arms more into an a frame type of shape. Palms can go up or down whatever feels better.
Wider arms, Kimberly, just because we can, and bring your heels away just a pinch. Arms wider. Arms wider. Palms up. Now from here, stand into your feet to lift your pelvis up neutral bridge.
No articulation. And all ten toes have a purpose. So they're gonna stay on the mat. And then increase at the hips to sit back down. 4 more. Let's press up.
And lower down. The ball of the foot and the heel, again, find that weight and let the toes lay down peacefully as well. 2 more. Let's lift up. And we'll sit down. And last one, lift up and hold, While we're here, let's do a typewriter quickly. The pelvis will slide to one side and then the other side, staying level on the same plane, and side.
Yep. And lift up toward my hand. There you go. And pelvis stays level as you slide the weight is going to stay balanced over the center of the feet. So no slaloming. And good. Return to the center.
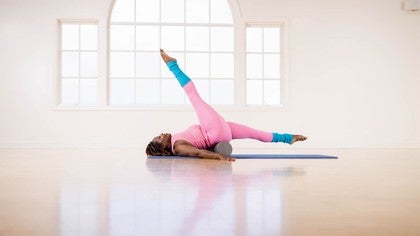
Roll down the spine this time. Let your back have that moment to stretch and release. And PS guys, oxygen is not optional. So keep breathing deeply, bring the legs all the way together. So let's take one leg up to the ceiling here, and release your tail into the mat that we wanna be neutral before we go anywhere.
It's going to make the neutral bridge easier here. Press the pelvis and the leg up to the ceiling and hold. And sit back down. No articulation. 3 more. Press up and lower.
And 2 more lift. And they do this so beautifully that it makes me wanna just move on to the next side after this next rep and sit back down hold. Now we're just going to switch legs. Again, pelvis is neutral. We haven't gone anywhere yet.
Hips will lift up and down, and 3 more, and lower. What I really love is that there's no tension in the foot The ankle is stretching again. In Pilates, we really wanna be making sure the energy is used where it's needed and where we're not needing it, we're not overworking. Come all the way down and bring the leg down as well. Hands will come behind your head, We'll do ab curl obliques.
Very simple. You'll exhale not and curl up. And as you come up, you're rotating and twisting, looking beneath the armpit and then coming back down to the center. 2nd side, exhale curl twist and rotate tail stays neutral and inhale back down. And exhale curl and twist, bring your elbow toward me. Yeah. There we go. And lower.
And, again, the curl is coming from the upper half. So can we negotiate to keep the lower half stable? One more each way? Exhale curling and twisting and center, and last one curling and twisting, And center down, curl up center looking at your thighs, hold. Both legs are going to slide along the mat and go up into your hover here. Hover the legs up.
Soft toes. And now we'll turn the legs out. We'll pull in into a frog position. Exhale pull and inhale stretch. And 2 and stretch. And now as you're pulling in, imagine I'm holding on to your heels.
What would you have to do to pull your heels back? 4 more exhale pull and stretch 3 more. Keep the gaze ahead rather than down so you don't get bungee in your necks and hold it in the frog position. Leave the legs there. Lower the head down.
Just a small rest fit. It's over. Cur the head back up and hold. For swimming frog, we'll take the legs straight Hold. Open wide. Hold. Keep the thighs still bend the knees so the heels come together.
And then again, press and open and bend. 2 more and press and open and curl up a little higher, press and open, bend, and hold, reverse, open, wide, and zip together and drag it in. Again, open, and zip, and in Well, 2 more. I can't remember how many I did. So sorry, guys. I'm Pilates teacher. I don't count. And pull in hold, Let's lower all the way down, and I'd like both of you to slide a little bit more forward on your mats. So bring your feet toward the inner. Parallel here.
Keep coming, Kimberly. All the way the edge just to be sure. Good. Our next trick is the rollover. One of my favorites, legs up.
And we'll go straight up. Now take a big breath in here, exhale, hover the pelvis and roll over Legss are going away from the center of the room. We're going to slip the legs around wide, roll down the spine, Let the legs come past the center, reaching toward the room, middle of the room, bring the legs together, bring them up, and over. And split and roll down. And you'll notice 2 different variations here. Kimberly takes her legs all the way to the floor.
Aaron lets them float those are all available to you as long as you're not rolling up onto your necks. The neck safety is the most important part. Split open, rolling down as the legs circle around, they come together at the low position, and then we reverse. Open wide, zip up and over. Keep reaching the arms toward the center of the room so that we're not bunching.
Stretch through the legs as we roll down chest stays broad, broad, broad, legs lower, split circle around up and over. Hey, guys. Breathing is really important. Breathing. Yes. Rolling down, lays lower, split, circle them around up and over. Now find your hollowness here.
Think of your sits bones going up and over towards your heels And as you roll down, keep that curl in your lower spine, rolling down, taking your time When your tailbone hits the mat, you'll curl up into a teaser. It's good for you. It's really good for you. Yes. Teaser. Hold. Yes. There we go. And I like that knee bend she did because that's reality.
Bend your knees. Place your feet down. And hold. Let's sit up for spine twist. So cheeks in the center of your mat. Yep.
Legs are ahead. And then I'd like for you to interlace your hands here and give a little bit of a pulse so you feel the connection underneath your arms without shrugging. Flex the ankles like you're standing on the wall and hopefully would not stand on the wall through toes picking your nose. So try to keep your toes a little bit soft here, hold. As we rotate, you're gonna turn toward me, and you're going to think of leading from your navel. So Exhale to rotate, rotate a little bit more, rotate a little bit more, and come back to the center.
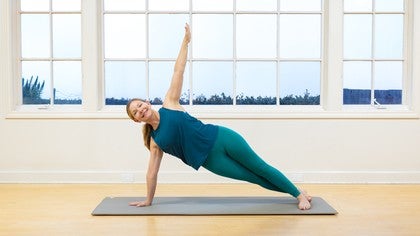
Another way, and twist They were doing a great job of keeping both heels reaching forward and center. Again, so if I'm the wall They're keeping equal pressure on me the whole time without leaning side to side or creating their own movements here. And twist a little bit more, a little bit more, and come to the center, hold it here. You're going to reach The forearm up to the ceiling, roll toward me, place your hand down, and go into a side plank. Beautifully done. Kimberly is stacking. Erin is tandem. It's all good here.
We're going to add porta bras. So the top arm is going to come down, around, and up. If you wanna add challenge, let the gaze follow the hand and up one more, down, around, and up, hold. Pase. The top leg is going to come in along the inseam. We're really lifting that bottom inner thigh up for balance, they're holding it here.
And now from here, they're gonna lift their hips higher into a side bend, lift, lift, let the arms stretch over, And then they're gonna slide down with grace and dignity. And then they're going to go to a quadrupet here, heads facing away from each other. Rotate your armpits forward, and I would like for you to maybe keep your hands a little bit tighter not too tight, but a little tighter toward the mint line than you normally would. Core your toes under. We're gonna go into a quadruped hover here.
And we're just gonna rock forward and rock back. So why do I love this quad hover again? Everything has to work to make this happen. They have to work to keep their abs in, to keep their spines from sagging, to keep their heads from dipping, inner thighs are connected. Oh, oh, yeah. And they have to do that breathing thing too. Come back and lower down with grace and dignity, and we go to the second side. So let's flip around and you'll go into your side plank here.
The rotation of the armpits forward is key so they don't end up buggered up around the neck and port a bra. Arm is gonna come down. And around and up and 2 more down, around, find the ribs, last one, down. Rotate the shoulders and up and reverse. Down around and up. Two more.
Blow and hold. Last one down around up and hold, and now here comes the. Lifting the hips. Sometimes you need something for the hands, so Again, make sure you can find your right alignment that's more important than suffering and not wanting to break out of the exercise. Speaking of suffering, here we are.
Now lift the hips up if you can take that deep and bend here. I love this option that she's taking because this is what her body really wanted to do. And now we're gonna come back down, floating with grace and dignity. Out of this position. Guys, I regret to inform you that jackknife is next. So I have to tell you, though, that was really good.
Thank you for doing that and not throwing things at me. I will take your towel, Kimberly. Thank you. So for Jackknife, I want you to bring your cheeks farther forward on your mat. Yep. And then from here, you'll lay down on your back and take your legs up.
Kimberly come in at just a little bit more We have got to accommodate for your long legs. You're welcome. I try to be nice when I can. So both legs are gonna go up. So for the jackknife, I want you to curl your pubic bone towards your nose, take the legs up the wall and over to the floor.
Find the floor. Give it a little love and then bring your legs straight up. Now as Kimberly brings her legs up, she's going to stand away from my hips. She's still reaching up and long. And now when she rolls down and away, she's starting at the top of her spine. Beautiful. Let's do it again.
Up and over, blow. Find the floor, tap down. Zip the legs up. And I'm just stepping in. Show her love so that she doesn't think I don't care by giving her jackknife. Now starting at the top, she does this so beautifully.
Release the neck. And let's go one more time. Kimberly, when you come down out of this one, you'll just come down and hold. Up and rolling down, standing into her seat as she comes down and away, And now we're going to roll up, bring your feet down, and just roll up. I mean, it doesn't have to be the roll up to come up.
There we go. Because the boomerang is next. Just kidding. Legs are gonna go long. Cross the outside ankle to me. And let's bring the hands back behind you.
I'd like for you to hinge into your hands as your legs lift up. Let the abdominals help you find that. And come back down. I wanna talk about something really quickly. Look at the difference in the proportions between my two friends here.
So Kimberly's got long praying mantis style legs, and arms, and Aaron is built a little bit more balanced. So their geometry is very, very different in this exercise. Eyes. And it's important to remember that. Sometimes our teachers, as well meaning as they may be, right, they want us all to look the same, but that's just not real life. So when you have to make an accommodation for your body's proportions, don't feel bad about it.
In fact, celebrate the fact that you knew what you needed to do for your own body. Okay? Chests up. Here we go. So now we're going to lift the legs from the center and start to hollow scoop back arms will come around as the legs go up and over. Switch the legs quick, hollow through the belly, gaze goes to the thighs come up, reach, drag the arms in, find the arms behind you float down as your arms extend, butterfly the arms up around and forward, Hollow your belly to roll up, find the floor, and here we go again.
Scooping back as the legs come up. Roll over scissor the legs roll down, come up and reach, sit tall, hold it at the top, floating down as the arms come back, Class and stretch over and roll up. That's enough torture for the moment. Now we're gonna go back to a side sit position for seated. I I call this a frame, but it's called seated twist.
So get into your mermaid like physician, but stack the knees, they'll bend in a little bit extra. Yep. Hand is on the floor. The other arm is reaching long. Now take a big breath in.
X, actually, I would bring your top foot in front. Yep. There we go. Like that. As you exhale, you're going to reach the arm up and overtake your hail to the ceiling and stretch to reach the on the back ankle like that. There we go. Hold it here. And now with grace and dignity, unfurl. So you're unwinding.
You're not just cats of flooming to the floor, bend your knees and come back down. Now this time as you go up and over, I want there to be next to no weight on your back foot. Here we go. Up and over, dive. There's no weight on that back foot. Give me a little bit more rotation here. Yep. So hip to the opposite armpit, and then we're floating back down.
Like, you want to be feather light as you touch the floor. Nice job, guys. Adding on on this one, up and over, reach past that ankle. Now the free foot, take it up to the ceiling in a needle, up and down. Again, up and down.
One more. Remember, you are reaching up in a way, but you're not taking it into your ribs. Come on down, grace and dignity, down to the floor, and now we'll square up into a plank heads inside, please. And now we're going to march. It is not a temper tantrum. Your arms are marching, bending one arm, and placing it down.
Other arm lifts and lowers. So why is this important? This is negotiating where the weight has to be in order to find the balance. It's also making sure all of the critical connections are turned on. They're awake and alert and alive. Excellent. Lower back down.
We've gotta do the a frame again on the second side. So legs toward the center. And, again, the top leg is crossed over, and these are together. The top foot is in front. Yes. And we're reaching that free arm, the arm that's not on the floor toward the center of the room.
Here we go. We rainbow the arm up and over. Tail bone comes up to the ceiling. Yep. And we're stretching, reaching under. And then we're going to come and roll back down light as a feather. Second side is we're gonna go up and over. Remember, no weight on that back foot. So the there's no weight on the back foot.
Pick this leg, foot up. Yes. There we go. And then floating back. No. Not that up. Let's do that again. Keeping the ankles crossed, but no weight on the foot up and over.
No weight on the left, right foot. And then we come back down. Now we'll add our needles. So up and over, make sure the hips are twisting because that makes the balance a lot easier. The free leg is going to go up and pull back down, keep reaching across the body here up, and go back down.
And now let's put weight on both feet. Square yourself to your hands. Weight on both hands. And you're in your down dog. Oh, look at that. Stretch through the heels and start to walk your hands back.
Until you feel your heels sink into the floor. And from here, you're going to scoop and roll up, keep your cheeks to yourselves, And good. Now let's step away from each other. Yes. Very nice. And the airplane is the last step here. So you'll start with let's start with your outside leg.
It's gonna be pointing behind you, and the leg will be turned out. Arms will be wide, lifting the leg as the torso goes over, and you wanna be parallel to the floor once you get there. Lot of standing foot, lot of standing under, but we worked on all this balance stuff. So let's see if we can bring it home. And then let's come back up.
Same leg. Again, stretching over and think about what we have to do to make these shapes happen. We did all kinds of things throughout the session to make this work come back up. One more. Don't forget about the energy through the arms and the upper body. That's why we did all of that work.
Breathing holding here. I'd like for you to rotate your pelvis so it's pointing away from me. I probably shouldn't have just sneak that in on you, but I didn't want to revolt. And now you'll square your pelvis back to the floor. Upper body stays square as you're rotating the pelvis, think of turning the pelvis over the standing femur, and then you're turning it back to square.
And then your foot gets really tired, so you come back up. Second side, leg is behind. And as you go over, really think about the opposition, So as I'm going over this way, I'm also going back that way. NPS, it only looks easy on me because I haven't been working out here. I've just been telling people what to do.
This is hard. Find that standing hamstring and use it for good, not for evil. And come back up, wide back, collect the ribs, hinging forward, and will stay here. Rotate your pelvis to face me, but not your shoulders. And square.
Stretch through your standing leg. Again, rotate the pelvis to face. Mees. Frederick toes. Like a gecko. And square and then come back up. Breathe. Breathe. Breathe. Oxygen. Stand tall.
Feet will go wherever you want them to go, and we'll bring one arm up for standing side bend. The weight is going to stay even. So there's no lateral shift stretch up and over, then your bent arm let it slide down the leg. Now as I'm going here, I'm keeping my hip pressing into my arm at the bottom. I'm keeping weight in this hip.
Let the head turn to face the floor and then pulling up second side hand to the hip arm goes up. I'm a little teapot. We're side bending. Hold. Slide the arm down.
Press the hip into the arm and the arm into the hip. Keep breathing, accordion, breathing into the side, rotate, look down at the floor, and then pull back up. Ladies, I'm honored. Thank you so much. Very well done, and thanks to all of you for watching this video.
Advanced Mat Workouts: 30-Minute Classes

Mention
 |
Misty Lynne Cauthen (Teacher) |
 |
Ivana N |
 |
Monica M |
 |
Karen M |
 |
Ilja |
 |
Birgit N |
 |
Marissa |
|
|
Megan C |
 |
Anne P. |
|
|
Sindisiwe M |
|
|
Mona H |
|
|
Jefflyn |
|
|
Molly M |
Comments


You need to be a subscriber to post a comment.
Please Log In or Create an Account to start your free trial.
